Introduction to Task Building#
Building custom tasks in ManiSkill is straightforward and flexible. ManiSkill provides a number of features to help abstract away most of the GPU memory management required for parallel simulation and rendering. By the end of this tutorial, you will learn how to create simple rigid-body tasks that simulate both on GPU and CPU. If you aren’t familiar with robotics/simulation and some terminology, we recommend you check out the simulation / robotics 101 page.
Building a custom task in ManiSkill is comprised of the following core components
Loading (Robots, Assets, Sensors, etc.) (run once)
Episode initialization / Randomization (run every env.reset)
Success/Failure Condition (run every env.step)
Extra Observations (run every env.step)
(Optional) Dense Reward Function (run every env.step)
(Optional) Setting up cameras/sensors for observations and rendering/recording (run once)
Visually the flow of environment creation under the gym API via gym.make and env.reset looks as so:
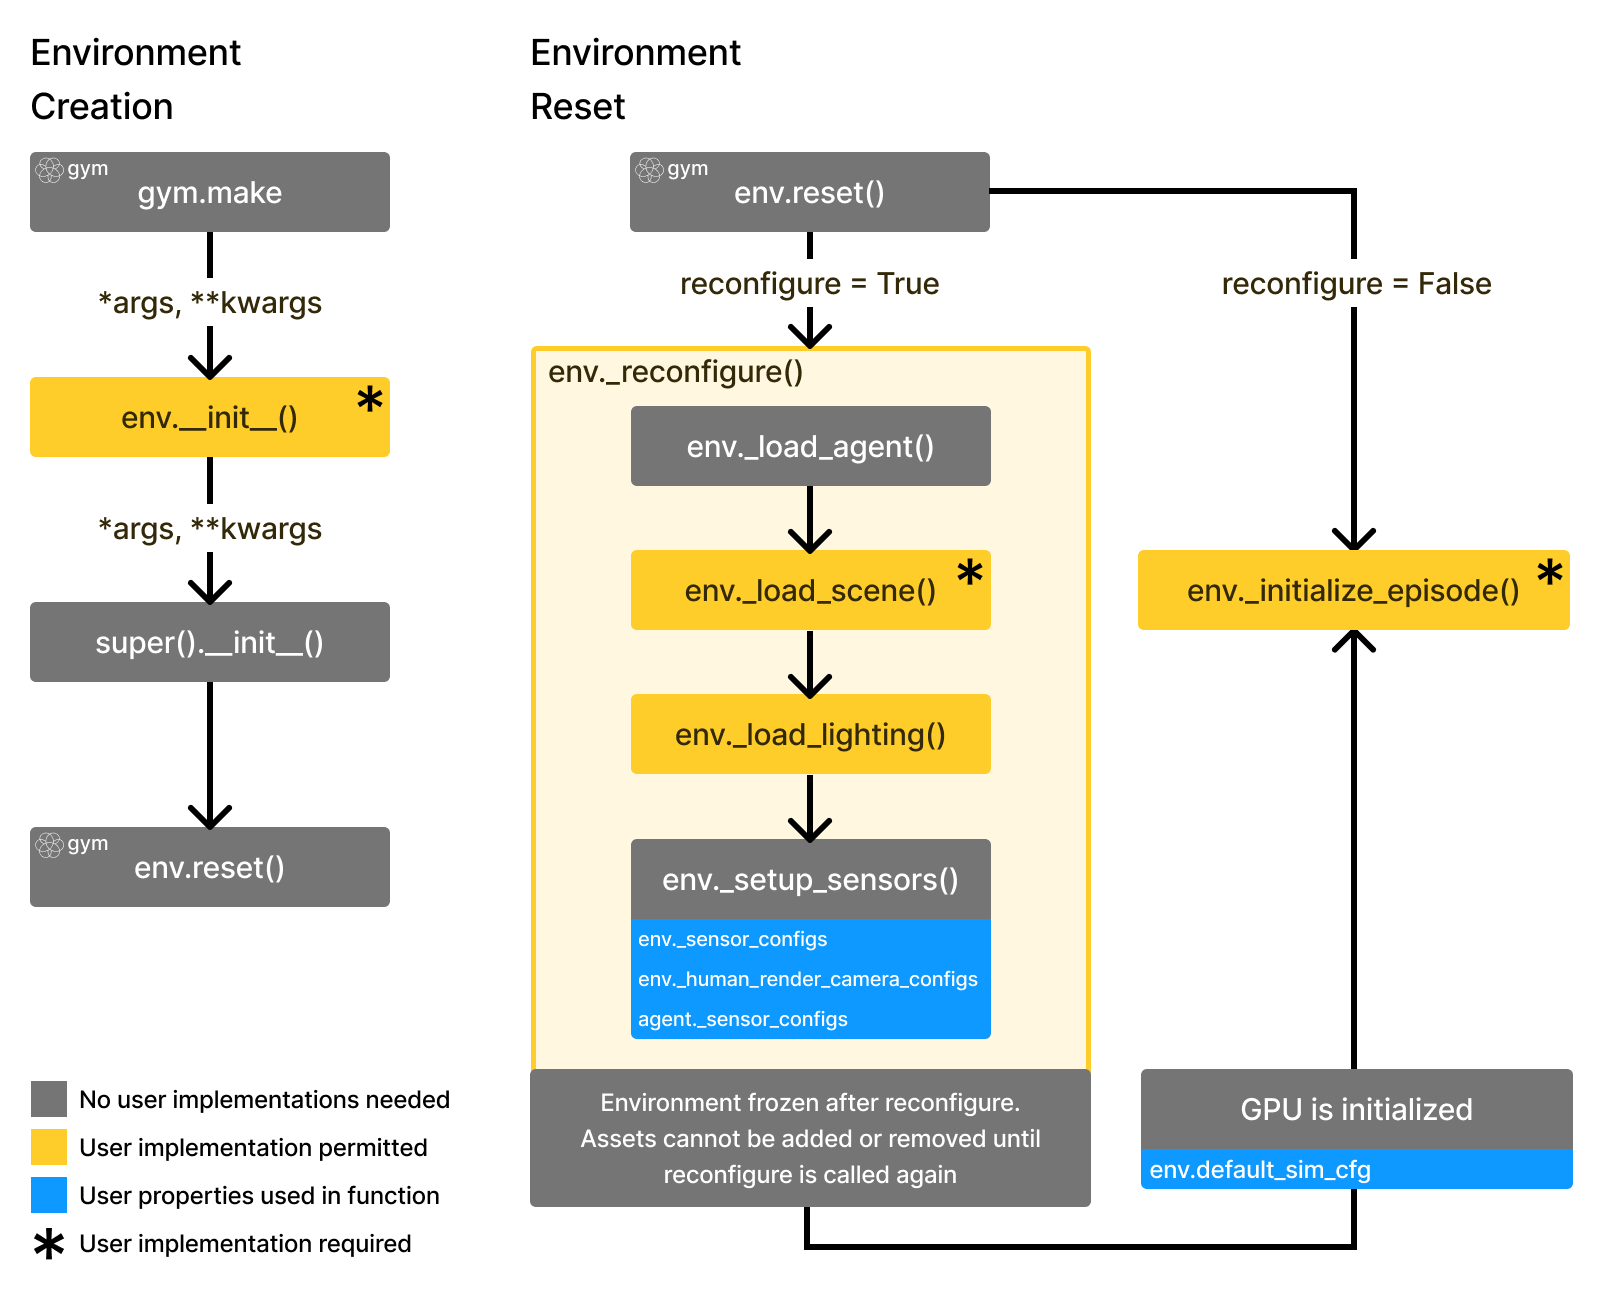
and env.step follows below:
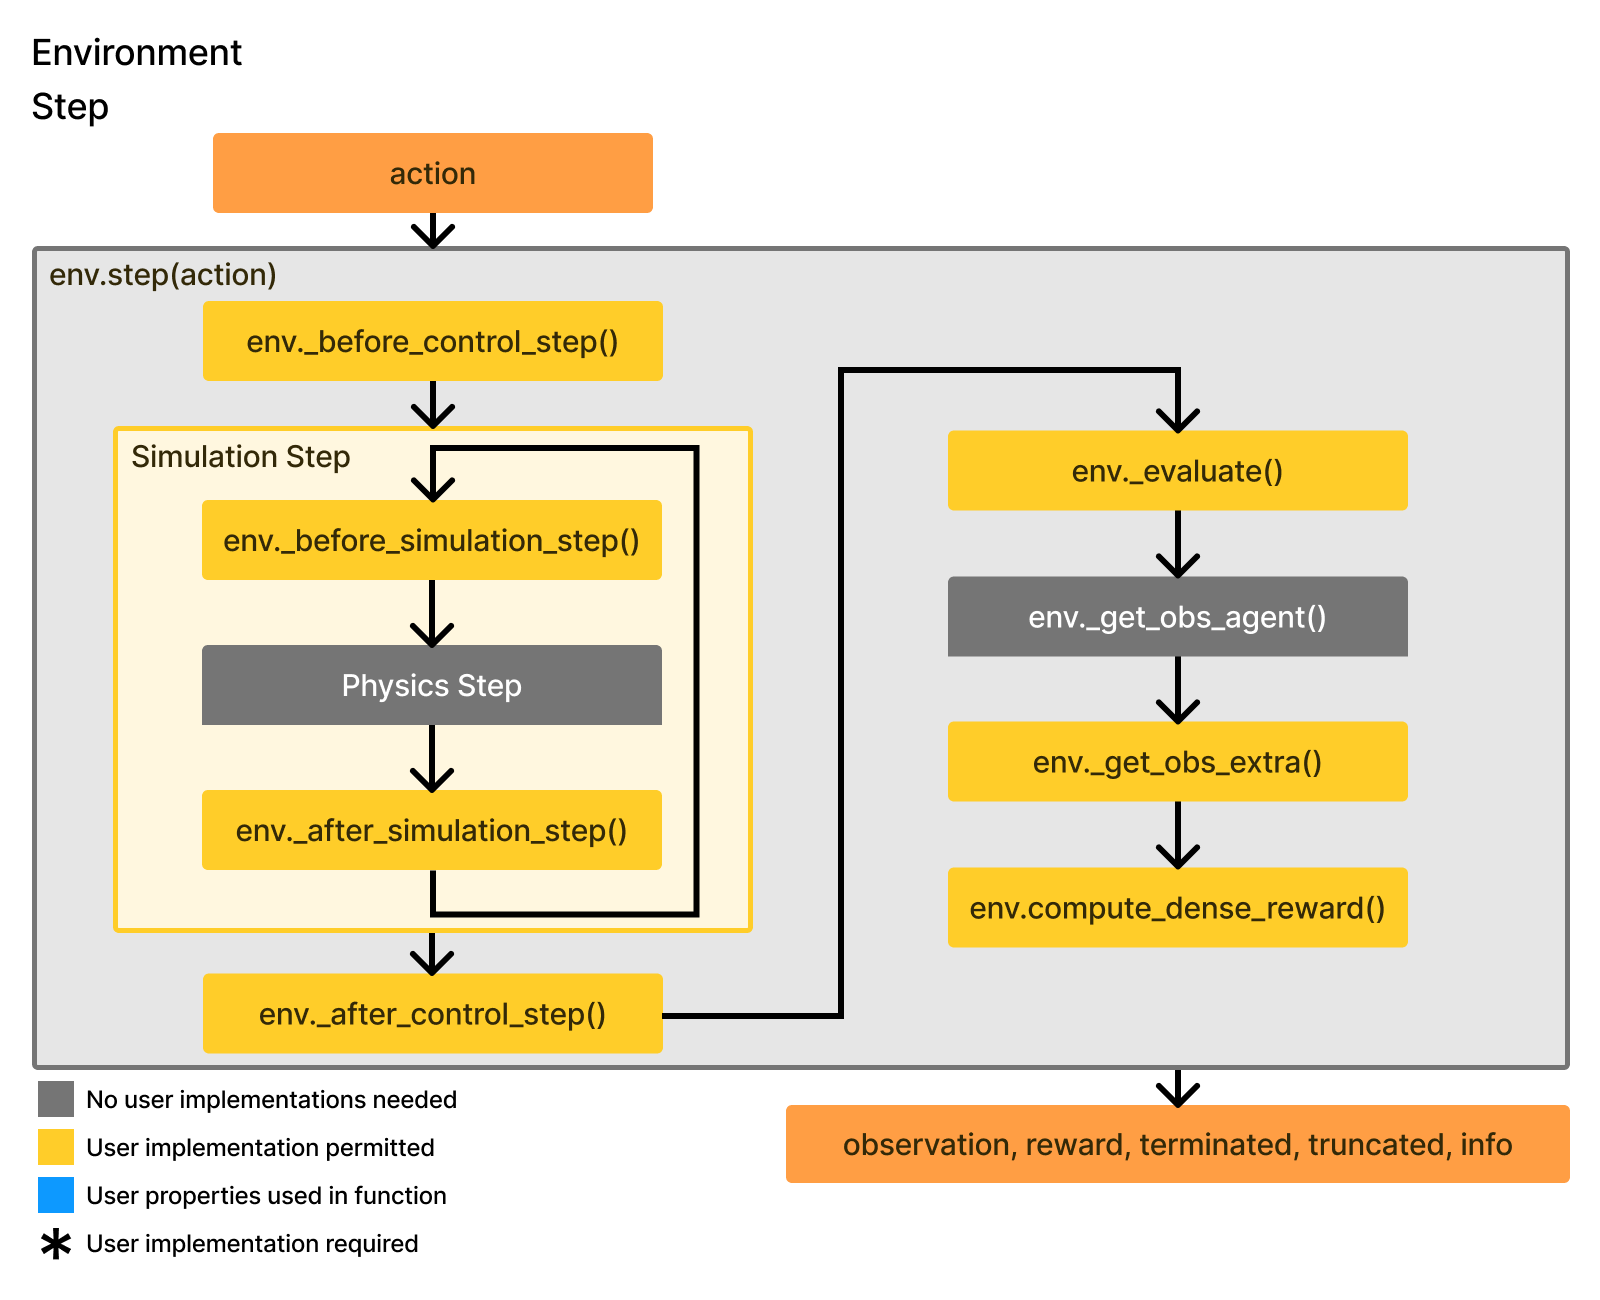
This tutorial will take you through most of the important yellow modules in the figures above that should be implemented to build a task.
To follow this tutorial easily, we recommend reading this alongside reading the annotated code for the PushCube task which describes the purpose of nearly every line of code. The advanced features page covers additional topics to do more advanced simulation and optimization such as dynamic GPU memory configuration, diverse object simulation, and more.
If you want to skip the tutorial and start from a template you can use the PushCube task as a template, the annotated template, or the bare minimum template.
If you have any questions or issues, feel free to ask in our discord or on our github
Setting up the Task Class#
All tasks are defined by their own class and must inherit BaseEnv, similar to the design of many other robot learning simulation frameworks. You must then also register the class with a decorator so that the environment can be easily created via the gym.make(env_id=...) command in the future. Environment registration is done via @register_env(env_id, max_episode_steps=...) where max_episode_steps indicates the time limit of the task.
import sapien
from mani_skill.utils import sapien_utils, common
from mani_skill.envs.sapien_env import BaseEnv
from mani_skill.utils.registration import register_env

@register_env("PushCube-v1", max_episode_steps=50)
class PushCubeEnv(BaseEnv):
    def __init__(self, *args, **kwargs):
        super().__init__(*args, **kwargs)
Loading#
At the start of any task, you must load in all objects (robots, assets, articulations, lighting etc.) into each parallel environment, also known as a sub-scene. This is also known as reconfiguration and generally only ever occurs once. Loading these objects is done in the _load_scene function of your custom task class. The objective is to simply load objects in with initial poses that ensure they don’t collide on the first step, and nothing else. For GPU simulation at this stage you cannot change any object states (like velocities, qpos), only initial poses can be modified. Changing/randomizing states is done in the section on episode initialization / randomization.
Building objects in ManiSkill is nearly the exact same as it is in SAPIEN. You create an ActorBuilder via self.scene.create_actor_builder and via the actor builder add visual and collision shapes. Visual shapes only affect visual rendering processes while collision shapes affect the physical simulation. ManiSkill further will create the actor for you in every sub-scene (unless you use scene-masks/scene-idxs, a more advanced feature for enabling heterogeneous simulation).
Building Robots#
This is the simplest part and requires almost no additional work here. Robots are added in for you automatically and by default are initialized at the origin. You can specify the default robot(s) added in via the init function. In PushCube this is done as so by adding SUPPORTED_ROBOTS to ensure users can only run your task with the selected robots. You can further add typing if you wish to the agent class attribute.
from mani_skill.agents.robots import Fetch, Panda

class PushCubeEnv(BaseEnv):

    SUPPORTED_ROBOTS = ["panda", "fetch"]

    agent: Union[Panda, Fetch]

    def __init__(self, *args, robot_uids="panda", **kwargs):
        # robot_uids="fetch" is possible, or even multi-robot
        # setups via robot_uids=("fetch", "panda")
        super().__init__(*args, robot_uids=robot_uids, **kwargs)

    def _load_agent(self, options: dict):
        super()._load_agent(options, sapien.Pose(p=[0, 0, 1]))
To define the initial pose of the robot you override the _load_agent function. This is done in PushCube above. It is recommended to set initial poses for all objects such that if they were spawned there they don’t intersect other objects. Here we spawn the robot 1 meter above the ground which won’t clash with anything else. If you are intending to spawn multiple robots you can pass a list of poses to the _load_agent function.
Initializing/randomizing these robots occurs in the initialization / randomization section covered later. With this setup you can later access agent data via self.agent and the specific articulation data of the robot via self.agent.robot. For multi-robot setups you can access each agent via self.agent.agents.
To create your own custom robots/agents, see the custom robots tutorial.
Building Actors#
The _load_scene function must be implemented to build objects besides agents. It is also given an options dictionary which is the same options dictionary passed to env.reset and defaults to an empty dictionary (which may be useful for controlling how to load a scene with just reset arguments).
Building a dynamic actor like a cube in PushCube is done as so
class PushCubeEnv(BaseEnv):
    # ...
    def _load_scene(self, options: dict):
        # ...
        builder = self.scene.create_actor_builder()
        builder.add_box_collision(
            # for boxes we specify half length of each side
            half_size=[0.02] * 3,
        )
        builder.add_box_visual(
            half_size=[0.02] * 3,
            material=sapien.render.RenderMaterial(
                # RGBA values, this is a red cube
                base_color=[1, 0, 0, 1],
            ),
        )
        # strongly recommended to set initial poses for objects, even if you plan to modify them later
        builder.initial_pose = sapien.Pose(p=[0, 0, 0.02], q=[1, 0, 0, 0])
        self.obj = builder.build(name="cube")
        # PushCube has some other code after this removed for brevity that
        # spawns a goal object (a red/white target) stored at self.goal_region
You can build a kinematic actor with builder.build_kinematic and a static actor with builder.build_static. A few sharp bits to keep in mind
Dynamic actors can be moved around by forces/other objects (e.g. a robot) and are fully physically simulated
Kinematic and static actors are fixed in place but can block objects from moving through them (e.g. a wall, a kitchen counter).
Kinematic actors can have their pose changed at any time. Static actors must have an initial pose set before calling
build_staticviabuilder.initial_pose = ...Use static instead of kinematic whenever possible as it saves a lot of GPU memory. Static objects must have an initial pose set before building via
builder.initial_pose = ....
Note that by default, if an object does not have an initial pose set in its builder, ManiSkill will set it to a default pose of q=[1,0,0,0], p=[0,0,0] and give a warning. For simple tasks this may not matter but when working with more complex objects and articulations, it is strongly recommended to set initial poses for all objects as GPU simulation might run into bugs/issues if the objects at their initial poses collide.
We also provide some functions that build some more complex shapes that you can use by importing the actors package:
from mani_skill.utils.building import actors
Once built, the return value of builder.build... is an Actor object, which manages every parallel instance of the built object in each sub-scene. Now the following occurs which makes it easy to build task rewards, success evaluations etc.
self.obj.pose.p # batched positions of shape (N, 3)
self.obj.pose.q # batched quaternions of shape (N, 4)
self.obj.linear_velocity # batched velocities of shape (N, 3)
# and more ...
For object building, you can also use reusable pre-built scene builders (tutorial on how to customize/make your own here). In Push Cube it is done as so
class PushCubeEnv(BaseEnv):
    # ...
    def _load_scene(self, options: dict):
        self.table_scene = TableSceneBuilder(
            env=self,
        )
        self.table_scene.build()
        # ...
The TableSceneBuilder is perfect for easily building table-top tasks, it creates a table and floor for you, and places the fetch and panda robots in reasonable locations.
A tutorial on how to build actors beyond primitive shapes (boxes, spheres etc.) and load articulated objects is covered in the tutorial after this one. More advanced features like heterogeneous simulation with different objects/articulations in different parallel environments is covered in the advanced features page. Finally, if you intend on randomizing objects/textures etc. in parallel environments, we highly recommend understanding the batched RNG system which details how to ensure reproducibility in your environments.
We recommend you to first complete this tutorial before moving onto the next.
Episode Initialization / Randomization#
Task initialization and randomization is handled in the _initialize_episode function and is called whenever env.reset is called. The objective here is to set the initial states of all non-static objects, including the robot.
As the task ideally should be simulatable on the GPU, batched code is unavoidable. Note that furthermore, by default everything in ManiSkill tries to stay batched, even if there is only one element. Finally, like _load_scene the options argument is also passed down here if needed.
An example from part of the PushCube task
from mani_skill.utils.structs.pose import Pose
import torch
class PushCubeEnv(BaseEnv):
    # ...
    def _initialize_episode(self, env_idx: torch.Tensor, options: dict):
        # using torch.device context manager to auto create tensors
        # on CPU/CUDA depending on self.device, the device the env runs on
        with torch.device(self.device):
            b = len(env_idx)
            # use the TableSceneBuilder to init all objects in that scene builder
            self.table_scene.initialize(env_idx)

            # here is randomization code that randomizes the x, y position
            # of the cube we are pushing in the range [-0.1, -0.1] to [0.1, 0.1]
            p = torch.zeros((b, 3))
            p[..., :2] = torch.rand((b, 2)) * 0.2 - 0.1
            p[..., 2] = self.cube_half_size
            q = [1, 0, 0, 0]
            obj_pose = Pose.create_from_pq(p=p, q=q)
            self.obj.set_pose(obj_pose)
An env_idx is one of the arguments to this function, and is a list of environment IDs that need initialization. This is given as ManiSkill supports partial resets, where at each timestep potentially only a subset of parallel environments will undergo a reset, which calls _initialize_episode here.
Since a scene builder is used, to initialize objects to their original states, we simply call self.table_scene.initialize(env_idx), a function all scene builders implement.
In the PushCube task, we randomize the pose of the cube by generating a random xy position on the surface of the table (the surface of the table is at z = 0). Notice that we only generate b = len(env_idx) random positions as we only need to change b objects in b parallel environments that are undergoing resetting. Note that we use torch.rand for randomization. The random number generator (RNG) state of torch is already seeded for you in this part of the code so you can freely use torch.rand without reproducibility concerns.
ManiSkill further provides a safe-guard feature that restricts changes to object state only works for objects in parallel environments that are to be initialized. Thus self.obj.set_pose will only accept a batched pose with b elements, and will only ever change those b objects undergoing reset and initialization. The same applies to modifying articulation qpos via e.g. self.my_articulation.qpos = ... or setting velocities etc. This restriction helps avoid potential bugs around messing up the wrong sub-scene’s objects.
Working with Poses#
In robot simulation, every object has a pose, which represents the object’s position and orientation as 3D positon vector and a 4D quaternion.
Another feature shown here is the Pose object, which is a simple wrapper around the original sapien.Pose object that allows you to manage a batch of poses on the GPU and do transformations with poses. To create the Pose object you can do one of the two options
Pose.create(raw_pose)
Pose.create_from_pq(p=p, q=q)
raw_pose is a vector with shape (b, 7), where 3D position and 4D quaternions are concatenated to form 7 dimensional vectors.
p, q are position and quaternions. Pose.create_from_pq has a feature where it will accept unbatched arguments and batch+repeat p or q if the other value is batched. For example in the PushCube sample we do
# p here has shape (b, 3)
q = [1, 0, 0, 0]
obj_pose = Pose.create_from_pq(p=p, q=q)
While q is a flat array (python list) representing a single quaternion, p is a batch of b 3D positions. Pose will create a Pose object that has batch size b and the ith pose in obj_pose will have position p[i] and constant quaternion q. The same effect occurs the other way around and provides some convenience to avoid having users write too much batching code themselves.
The Pose object also supports flexible slicing/indexing/masking that you may expect for a typical numpy array or torch tensor. For example, you can do the below
# assume pose object here if of shape (4, 7) managing 4 different poses
pose.shape
# returns (4, 7)
pose[2]
# returns a single Pose object with shape (1, 7) managing 1 pose
pose[0:2]
# returns a single Pose object managing the poses at indexes 0 to 2
pose[[True, False, False, True]]
# returns a single Pose object managing poses at indexes 0 and 3
Success/Failure Conditions#
For each task, at each timestep (when env.step is called) we need to evaluate the current state of the task, typically to see if its in a fail or success state. In terms of the gym interface, if success or fail is True, then terminated is True and you can check the returned info object to see if it was because of success or failure. In PushCube, we regard it to be successful if the cube is pushed into the goal region, which is evaluated as so
class PushCubeEnv(BaseEnv):
    # ...
    def evaluate(self):
        # success is achieved when the cube's xy position on the table is within the
        # goal region's area (a circle centered at the goal region's xy position)
        is_obj_placed = (
            torch.linalg.norm(
                self.obj.pose.p[..., :2] - self.goal_region.pose.p[..., :2], axis=1
            )
            < self.goal_radius
        )

        return {
            "success": is_obj_placed,
        }
PushCube task here does not define a fail condition, but you could define one yourself to check if the cube falls off the table (in which case then the task is impossible to solve).
Attention
When writing evaluate ensure the data returned in the dictionary is all batched or else it can cause bugs. ManiSkill tries to keep all data inside ManiSkill batched whenever possible.
The end result should yield the following
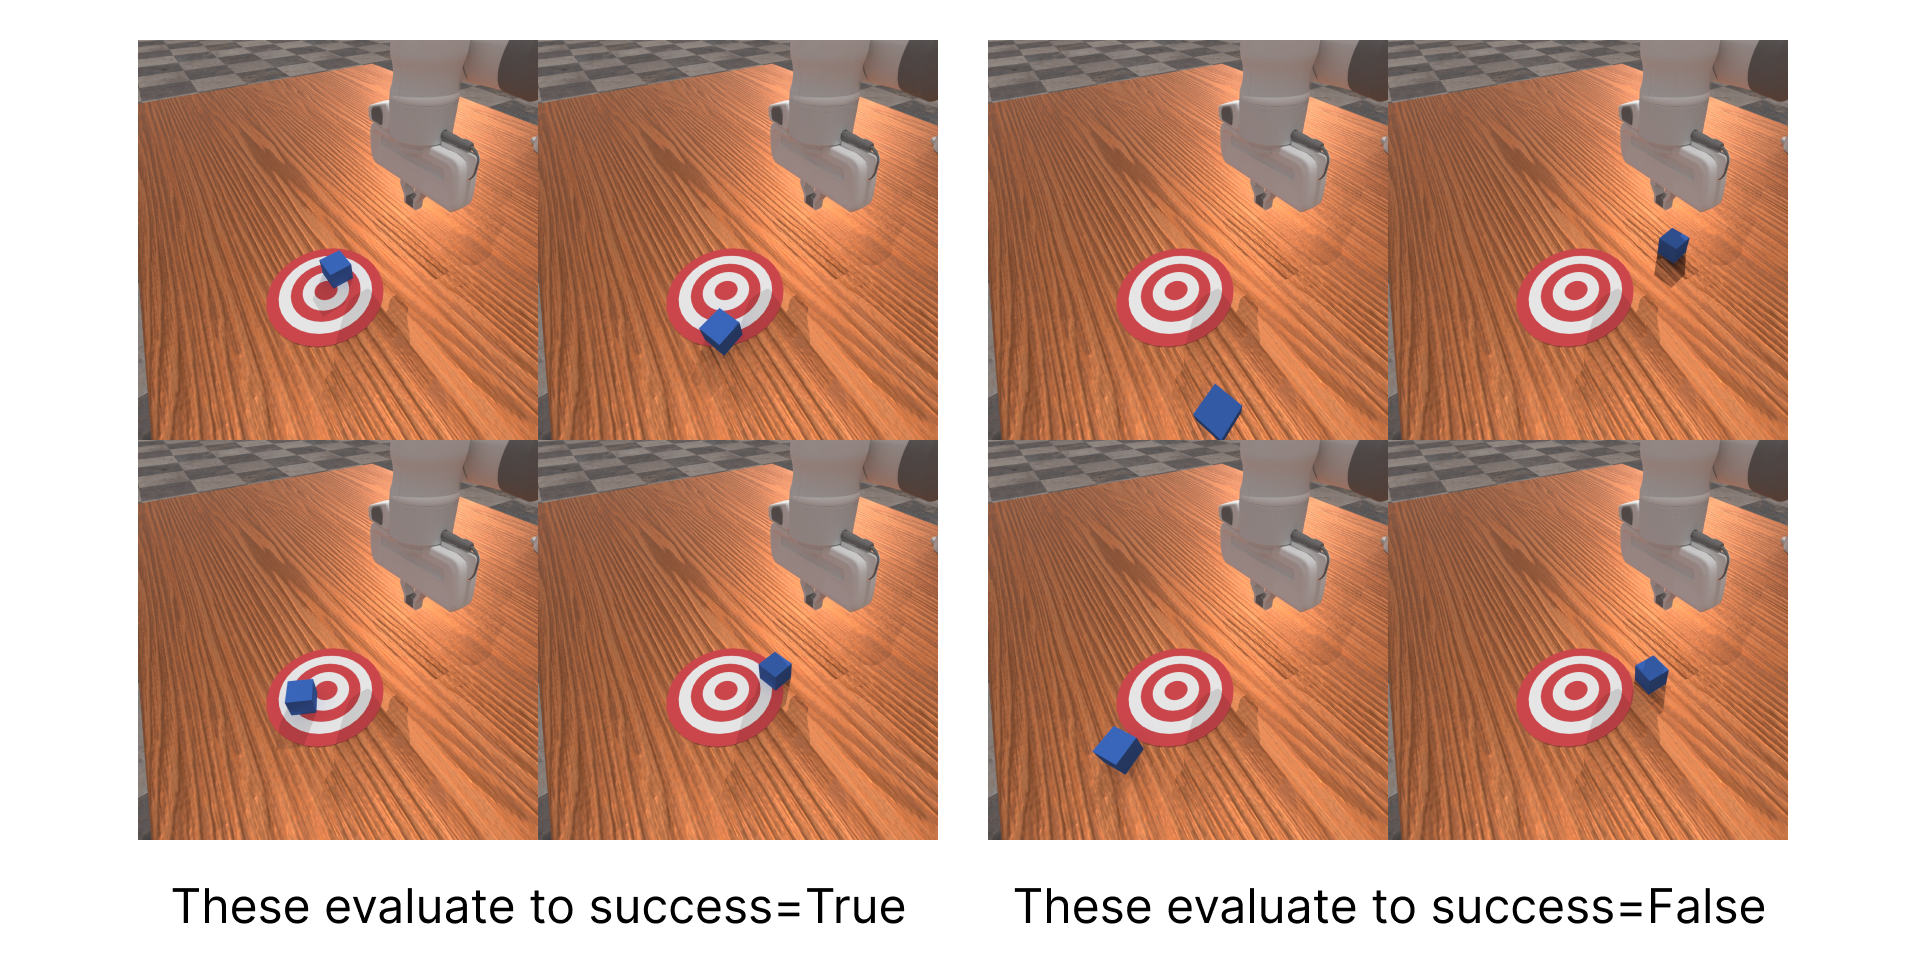
Note that some tasks like locomotion/control tasks in dm-control would be tasks where there is no success or failure evaluation. This kind of task is supported and in those cases the evaluation function can just return an empty dictionary.
Extra Observations#
By default, the observations returned to users through calls to env.reset and env.step includes the agent propioceptive data (Like joint angles/velocities) that normally you have access to in the real world.
To better support state based observations, you need to augment the observations given to users by implementing the _get_obs_extra function. This function takes the info object generated via the earlier defined evaluate function as input and returns the augmented observation data as a dictionary.
Generally you want to ensure you do not provide any ground-truth information that should not be available unless the observation mode the user requests is asking for it, such as the pose of the cube you are pushing. There are some data like self.agent.tcp.pose which are always available for single-arm robots and given all the time, and also critical information like goal information in tasks like PickCube which direct where the robot should pick the cube to. To check if a user is requesting for state data, you can check if self.obs_mode_struct.use_state is true. It is true if the provided obs_mode when creating an environment includes “state” or “state_dict” in it. More details on observation modes are available in the separate observation page.
class PushCubeEnv(BaseEnv):
    # ...
    def _get_obs_extra(self, info: Dict):
        # some useful observation info for solving the task includes the pose of the tcp (tool center point) which is the point between the
        # grippers of the robot
        obs = dict(
            tcp_pose=self.agent.tcp.pose.raw_pose,
        )
        if self.obs_mode_struct.use_state:
            # if the observation mode requests to use state, we provide ground truth information about where the cube is.
            # for visual observation modes one should rely on the sensed visual data to determine where the cube is
            obs.update(
                goal_pos=self.goal_region.pose.p,
                obj_pose=self.obj.pose.raw_pose,
            )
        return obs
In order to understand exactly what data is returned in observations, check out the section on observations here
(Optional) Dense Reward Function#
You can define a dense reward function and then a normalized version of it
class PushCubeEnv(BaseEnv):
    # ...
    def compute_dense_reward(self, obs: Any, action: Array, info: Dict):
        # ...
        return reward

class PushCubeEnv(BaseEnv):
    # ...
    def compute_normalized_dense_reward(self, obs: Any, action: Array, info: Dict):
        # this should be equal to compute_dense_reward / max possible reward
        max_reward = 3.0
        return self.compute_dense_reward(obs=obs, action=action, info=info) / max_reward
compute_normalized_dense_reward is the default reward function used and returned from env.step. We recommend defining normalized reward function as these tend to be easier to learn from, especially in algorithms that learn Q functions in RL. The result of compute_dense_reward is returned when an environment created as gym.make(env_id=..., reward_mode="dense")
Dense reward functions are not required and can be skipped. If not implemented then those reward modes are not supported and will raise an error if you try to use dense reward modes. Sparse reward functions are available if the evaluation function returns a dictionary with the success/fail key. If the task is in a success state, +1 reward is given. If the task is in a fail state, -1 reward is given. Otherwise 0 is given.
(Optional) Setting up Cameras/Sensors for Observations and Recording#
If you want your task to be able to return information from sensors like cameras as part of observations, you need to implement a _default_sensor_configs property which should return a list of BaseSensorConfig objects. At the moment the only sensor implemented are Cameras. In the future other forms of sensors will be added. Adding a _default_human_render_camera_configs property will add cameras to be used to take pictures for the "rgb_array" render mode, which is usually used just for saving videos to look at, but are never used as part of the actual environment observations.
Below shows how to use CameraConfig to define sensors, you define its position, quaternion, width, height, fov, near, and far attributes.
from mani_skill.sensors.camera import CameraConfig
class PushCubeEnv(BaseEnv):
    # ...
    @property
    def _default_sensor_configs(self):
        # registers one 128x128 camera looking at the robot, cube, and target
        # a smaller sized camera will be lower quality, but render faster
        pose = sapien_utils.look_at(eye=[0.3, 0, 0.6], target=[-0.1, 0, 0.1])
        return [
            CameraConfig("base_camera", pose=pose, width=128, height=128, fov=np.pi / 2, near=0.01, far=100)
        ]
    @property
    def _default_human_render_camera_configs(self):
        # registers a more high-definition (512x512) camera used just for rendering when render_mode="rgb_array" or calling env.render_rgb_array()
        pose = sapien_utils.look_at([0.6, 0.7, 0.6], [0.0, 0.0, 0.35])
        return CameraConfig("render_camera", pose=pose, width=512, height=512, fov=1, near=0.01, far=100)
In the code above we use a useful tool sapien_utils.look_at(eye, target) which generates a pose object to configure a camera to be at position eye looking at position target. To debug the registered cameras for sensors, you can visualize them by running
import matplotlib.pyplot as plt
env = gym.make(env_id=your_env_id, render_mode="sensors")
env.reset()
img = env.render()
plt.imshow(img)
plt.show()
To visualize the human render you can change render_mode to “rgb_array”.
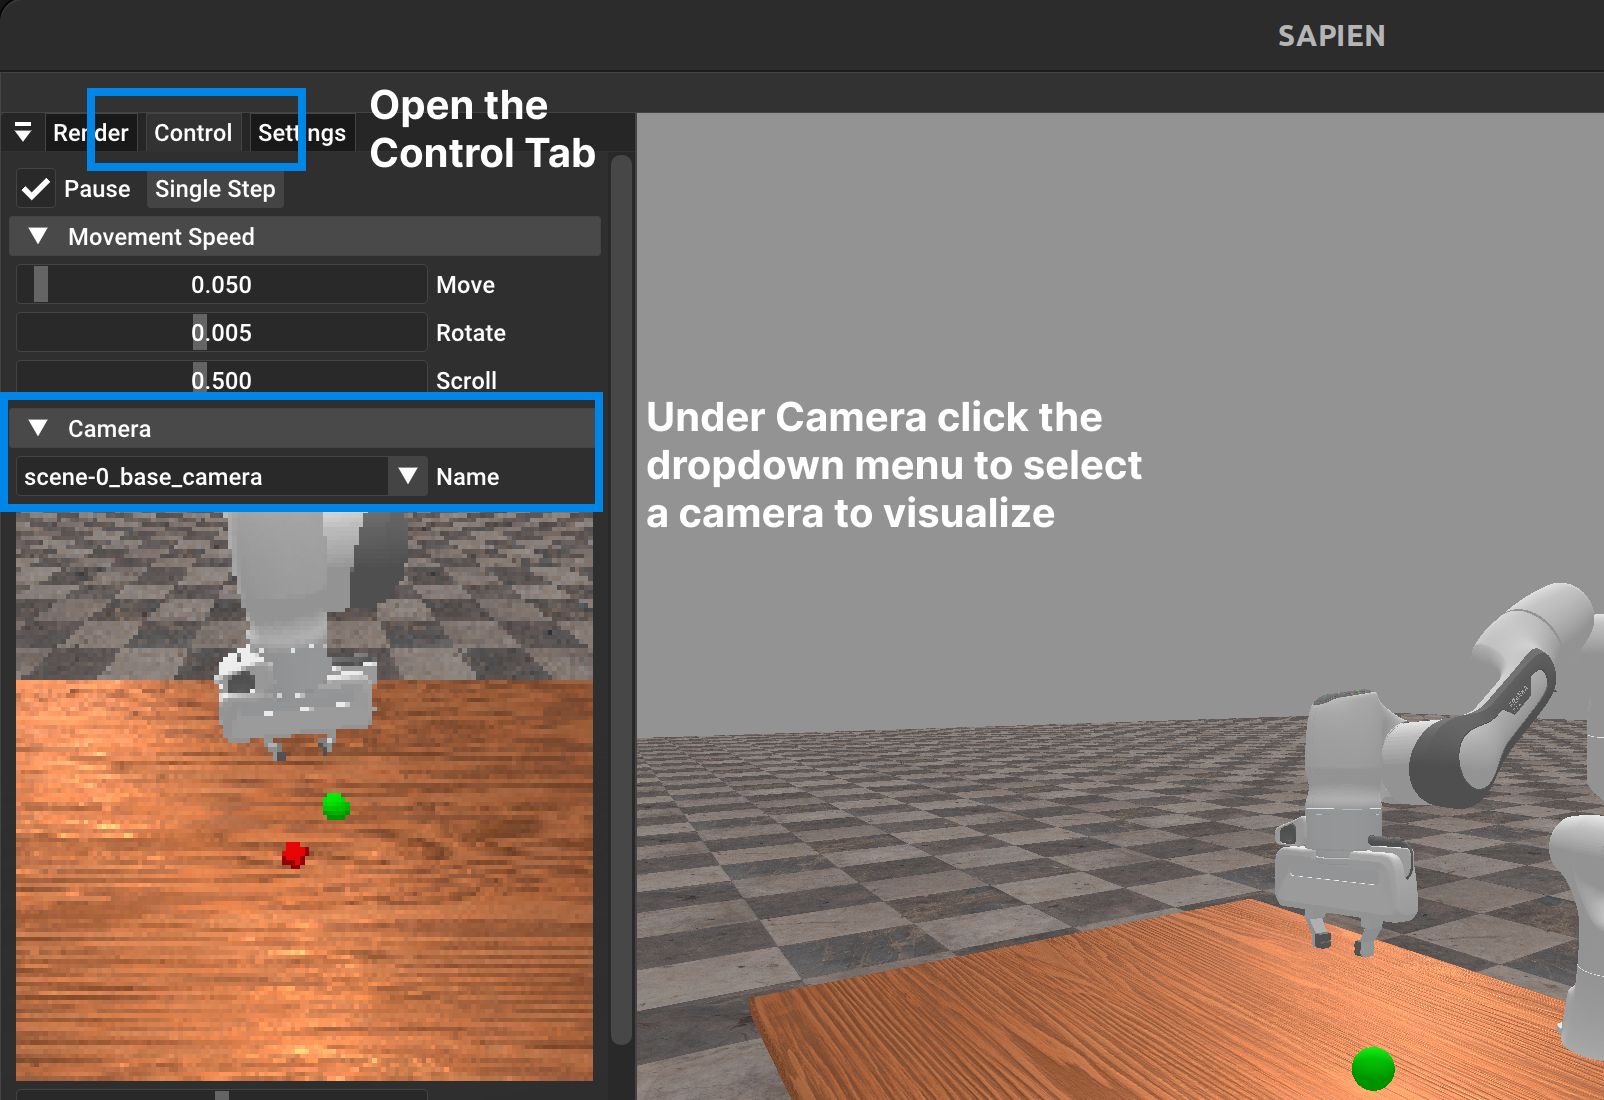
Alternatively via the GUI which can be opened by doing a while loop while running env.render_human(), under the control tab you can select any of the registered cameras and look at the exact RGB data it returns.
Tip
It’s recommended to setup the sensor cameras via _default_sensor_configs in such a way so that it looks at the important objects and avoids looking at anything too far away. The reason is the blank background has infinite depth and in visual observations it’s marked as a 0. Objects too far away (like the far away floor tiles) will yield very high depth values which may be problematic for machine learning workflows