GPU Simulation#
ManiSkill leverages PhysX to perform physics simulation parallelized on the GPU. This comes with a number of changes to how typical simulations work on the CPU and they are detailed here. It is recommended to read through this documentation as it covers some basics of GPU simulation and design principles of ManiSkill, which can massively help you write more efficient code/build optimized GPU parallelized tasks.
Scenes and Sub-scenes#
With GPU parallelization, the concept is that one can simulate a task thousands of times at once per GPU. In ManiSkill/SAPIEN this is realized by effectively putting all actors and articulations into the same physx scene and give each task it’s own small workspace in the physx scene known as a sub-scene.
The idea of sub-scenes is that reading data of e.g. actor poses is automatically pre-processed to be relative to the center of the sub-scene and not the physx scene. The diagram below shows how 64 sub-scenes may be organized. Note that each sub-scene’s distance to each other is defined by the simulation configuration sim_config.spacing value which can be set when building your own task.
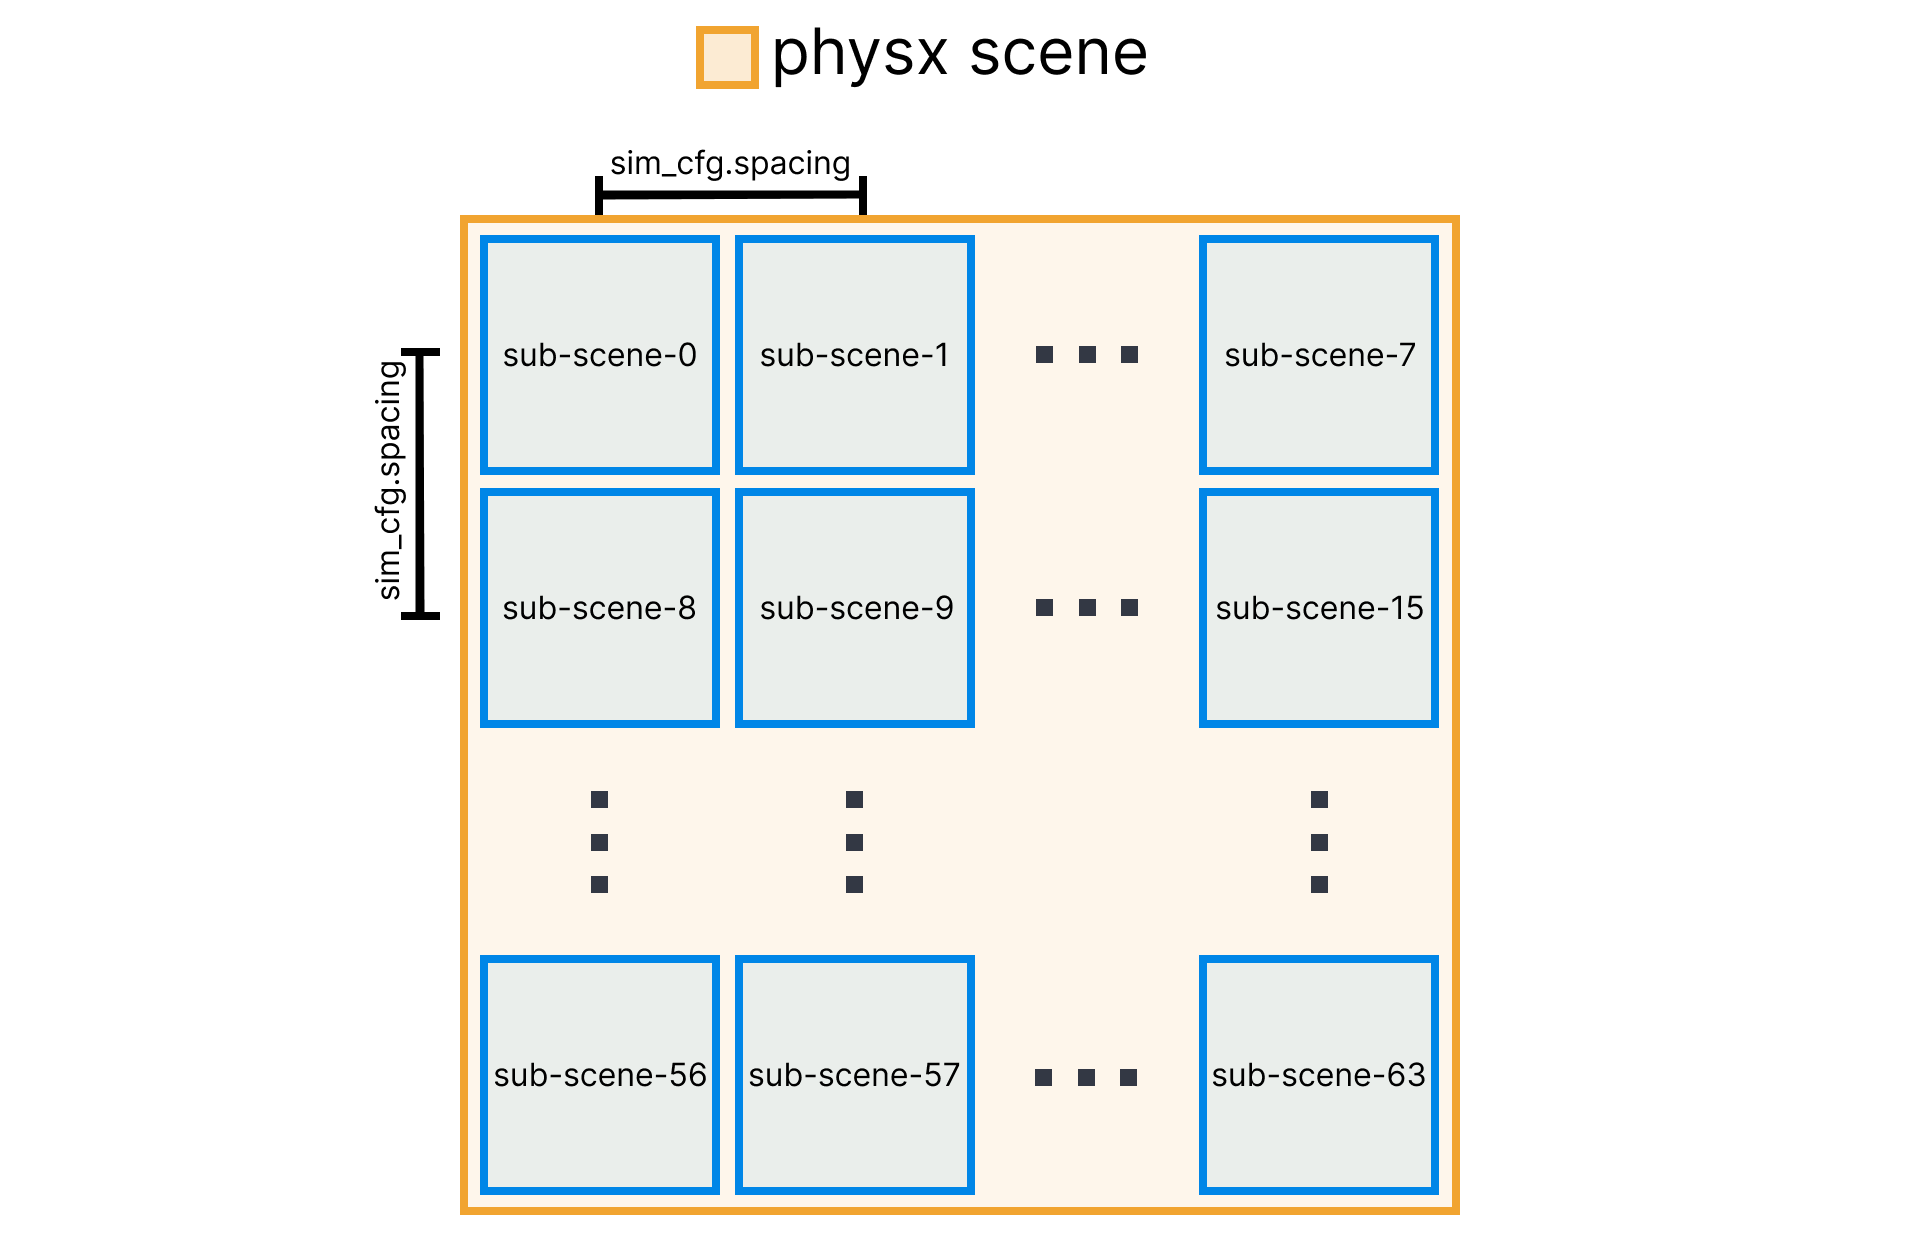
SAPIEN permits sub-scenes to be located at any location you want, ManiSkill just picks the most square setup with a fixed spacing parameter. Notice that if objects in one sub-scene go beyond its workspace, it can actually affect the other sub-scenes. This is a common bug users may face when simulating larger scenes of e.g. houses or out-door settings where the spacing parameter is set too low so objects from e.g. sub-scene-0 will contact with objects in sub-scene-1.
GPU Simulation Lifecycle#
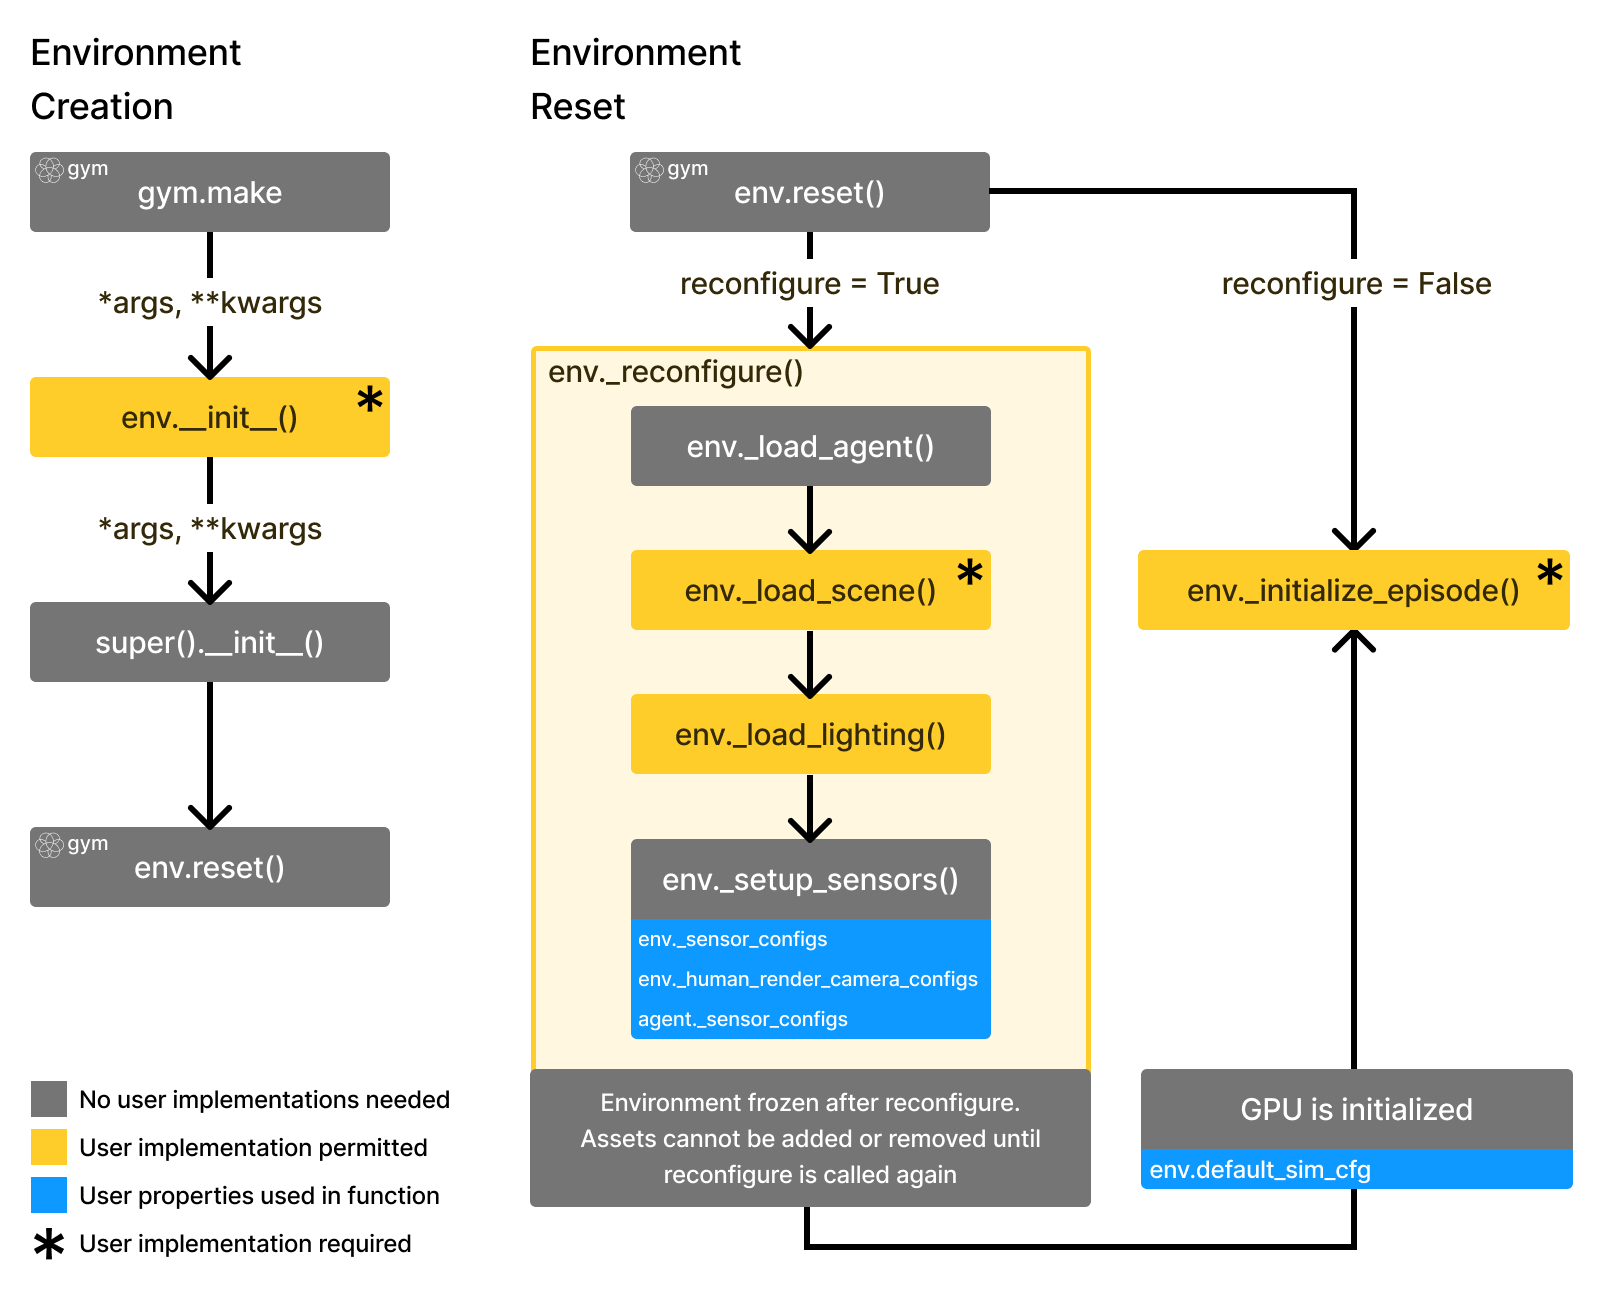
In ManiSkill, the gym API is adopted to create, reset, and step through environments.
The env.reset part consists of one time reconfiguration followed by initialization:
Reconfiguration: Loading objects (comprised of actors/articulations/lights) into the scene (basically spawning them in with an initial pose and not doing anything else)
A call to
physx_system.gpu_init()to initialize all GPU memory buffers and setting up all the rendering groups for parallelized renderingInitializing all actors and articulations (set poses, qpos values etc.).
Running
physx_system.gpu_apply_*to then save all the initialized data in step 3 to the GPU buffers to prepare for simulationRun
physx_system.gpu_update_articulation_kinematics()to update any articulation data (e.g., link poses) to prepare for fetchingRun
physx_system.gpu_fetch_*to update relevant GPU buffers and generate observation data out of that
In code we save the physx_system variable to env.scene.px
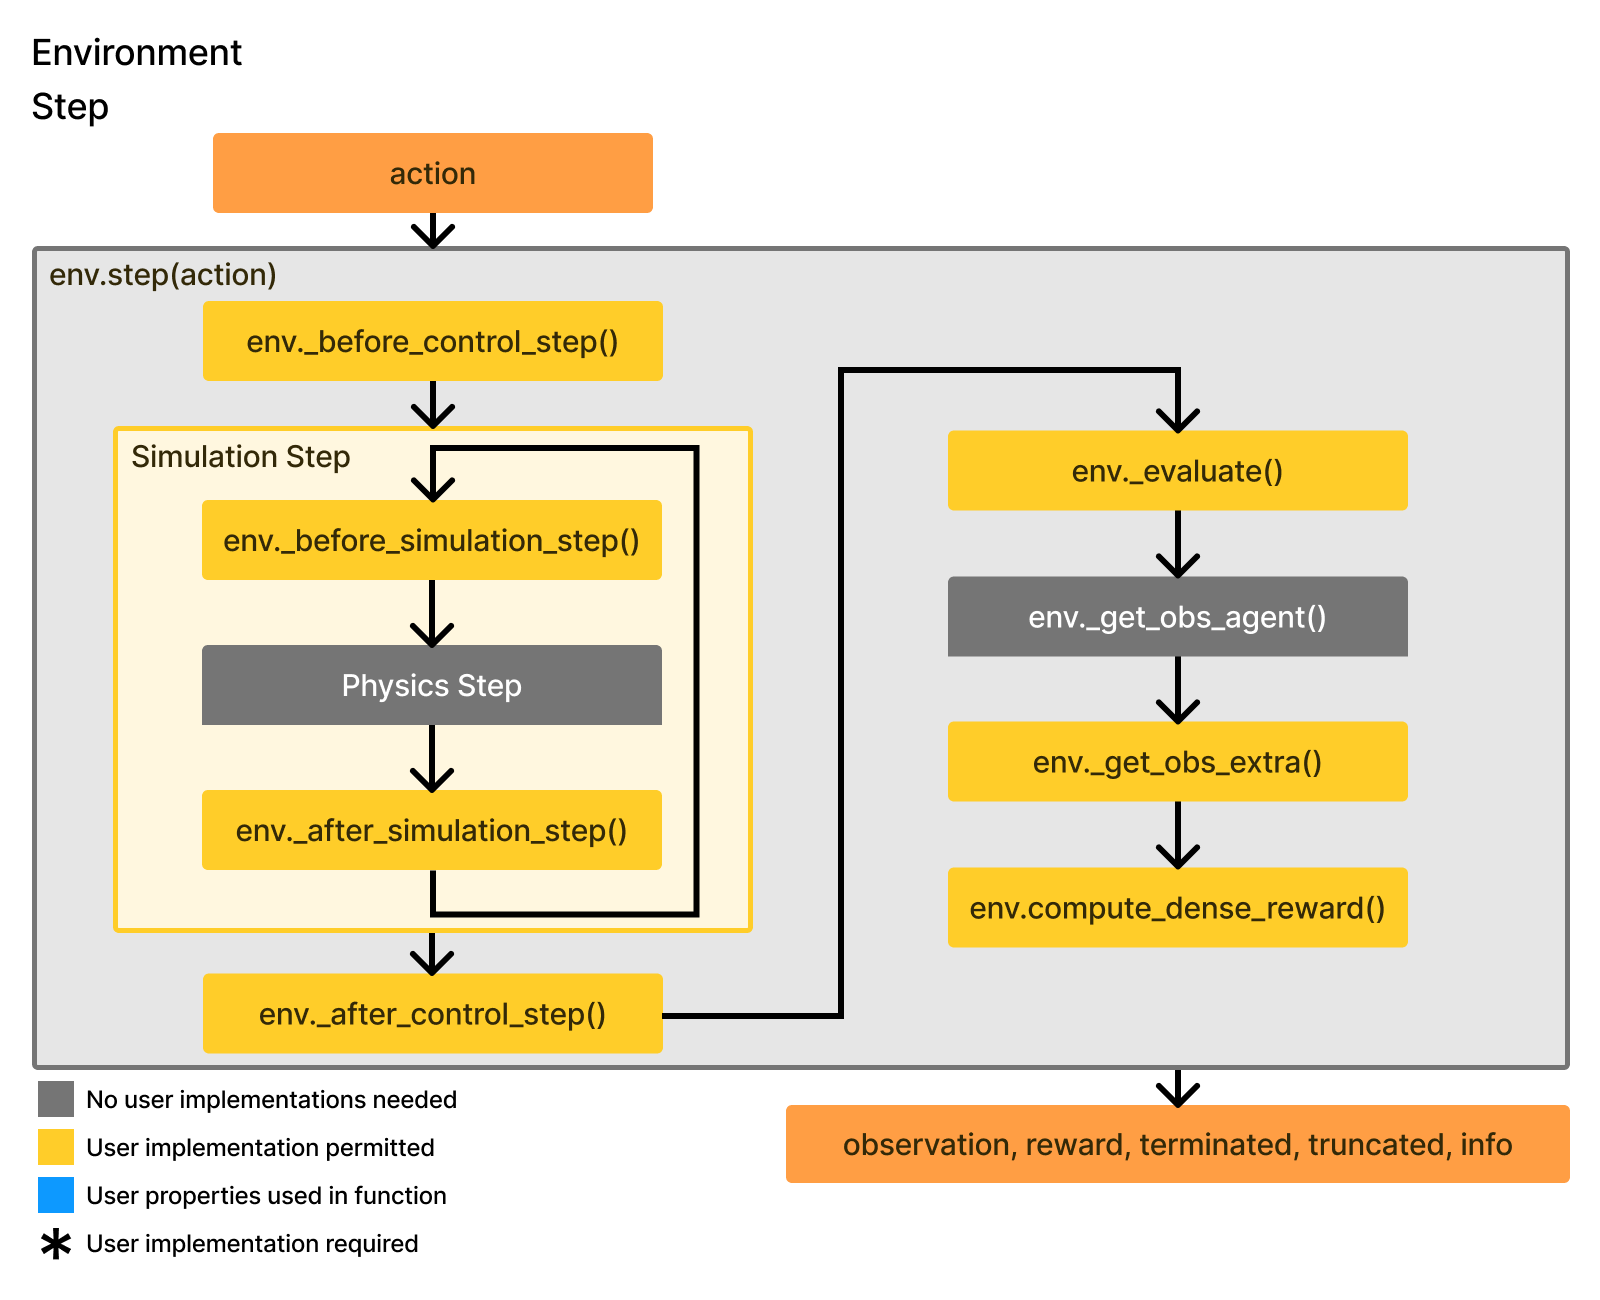
The env.step part consists of a repeated flow of taking in actions and generating output for env.step
Get user’s action (and potentially clip it)
Process the action and turn it into target joint position/velocity control signals to control agents
Run
physx_system.gpu_apply_articulation_target_positionandphysx_syste.gpu_apply_articulation_target_velocityto apply the targets from step 2.Run
physx_system.step()multiple times to step through the simulationRun
physx_system.gpu_fetch_*to update relevant GPU buffers and generate observation dataReturn step data: observation, reward, terminated, truncated, and info.
Data Organization on the GPU#
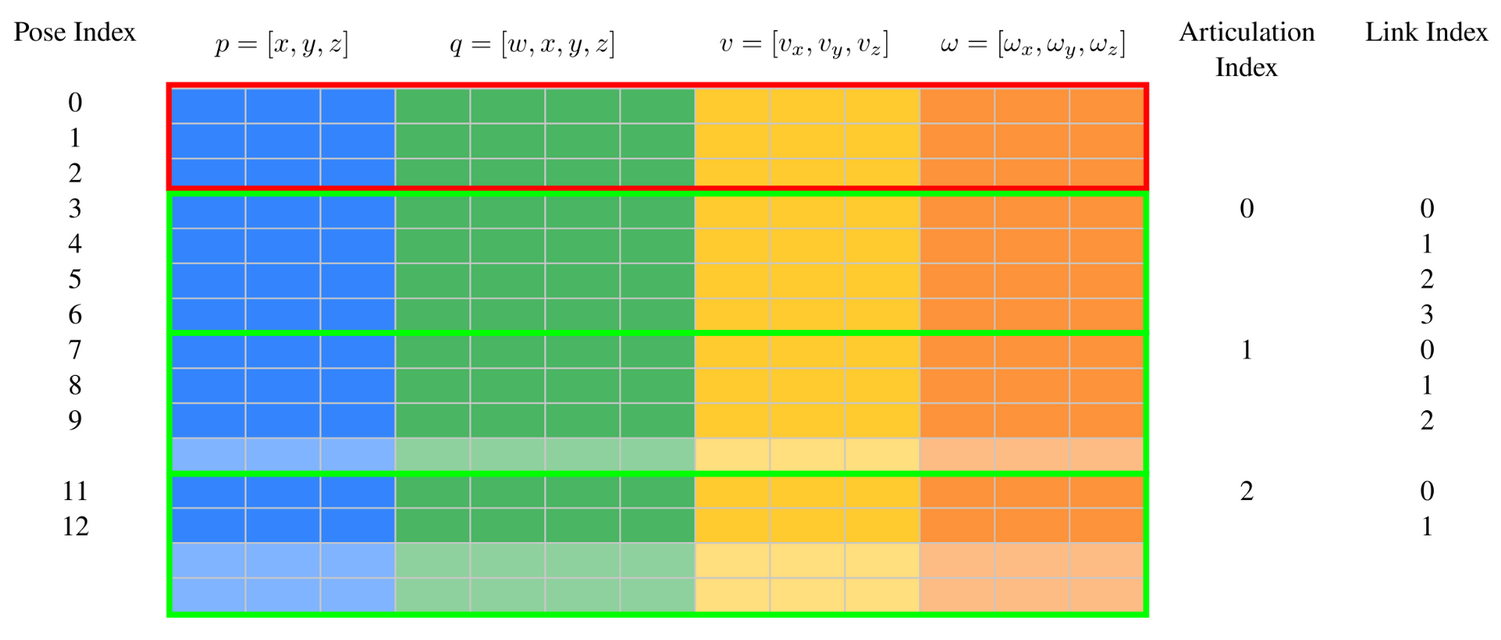
Rigid body data (which includes pose (7D), linear velocity (3D), and angular velocity (3D)) for every rigid body actor and articulation link in every sub-scene is all packed tightly in physx_system.cuda_rigid_body_data as one giant matrix and shaped as follows:
Users who plan to work with the GPU buffers directly may find this useful to understand, otherwise if you just use the exposed APIs given by ManiSkill shown in the tutorials this is all handled for you.
Notably this GPU buffer is not guaranteed to follow any intuitive sense of organization (e.g. every k rows holds data for one sub-scene) which is the tradeoff for getting better performance. But in any case this example shows the organization of data when the physx scene has 3 rigid body actors in red and 3 articulations with varying number of links / degrees of freedom (DOF) in green. SAPIEN will pad the number of rows allocated per articulation to be the highest DOF in the entire physx scene.
ManiSkill Design Principles#
Batched Everything#
ManiSkill aims to support both CPU and GPU parallelization schemes for parallelizing simulation. The reason is some tasks inherently are too difficult to simulate on a GPU any faster than you could get more CPUs on even non-industrial setups. With that in mind, nearly all of ManiSkill code exposes data to users as batched data (batch dimension = number of parallel environments) and treats a batch size of 1 in CPU simulation as a special case.
Managed Objects and Views#
ManiSkill can be seen as a pythonic interface over SAPIEN, the underlying system. SAPIEN seeks to be minimal, flexible, and fast. ManiSkill is more managed and provides tools to use SAPIEN easily for various workflows particularly in machine learning. A common example of this is that many objects in SAPIEN have equivalents in ManiSkill that simply wrap around the SAPIEN objects, most of which can be found in the mani_skill.utils.structs module
The Actor class for example wraps around sapien.Entity objects that correspond to actual objects spawned in the simulator in each sub-scene, and allows easy access to otherwise highly compact/optimized GPU buffers that SAPIEN exposes to then fetch batched data like pose, velocities, pairwise contact forces etc.
Similarly, the Pose class itself is a wrapper around the common sapien.Pose object and is effectively a batched version of that.
Another way to view these wrappers is to see that these wrappers are alternative views of otherwise the same data the raw GPU buffers expose. By understanding this perspective, it becomes easier to think about building tasks where you are simulating very different sub-scenes with different articulations that have different degrees of freedoms and different numbers of objects.
The functions Actor.merge, Articulation.merge, and Link.merge enable reshaping the view you have over the GPU buffers so that you can e.g. get the poses of a different objects in different parallel sub-scenes. You are no longer restricted to fetching data of just the same geometries and being forced to write complicated for loops / indexing code to figure out what indices on the GPU buffer correspond with what you want.