Custom Robots#
ManiSkill supports importing robots and assets via URDF and MJCF definitions. As ManiSkill was designed to allow one to flexibly change mounted sensors, controllers, and robot embodiments, ManiSkill at the moment does not automatically import those elements into the created robot, they must be defined by you.
In summary, the following elements must be completed before a robot is usable.
Create a robot class and specify a uid, as well as a urdf/mjcf file to import
Define useful keyframes (snapshots of robot state) for testing and other users
Define robot controller(s) (e.g. PD joint position control)
Define mounted sensors / sensors relative to the robot (e.g. wrist cameras)
Modeling materials of specific links to enable functionality (e.g. quadruped movement or object grasping)
This tutorial will guide you through on how to implement the Panda robot in ManiSkill. It will also cover some tips/tricks for modelling other categories of robots to ensure the simulation runs fast and accurately (e.g., mobile manipulators like Fetch, quadrupeds like Anymal)
1. Robot Class and Importing the Robot#
To create your own robot (also known as an Agent) you need to inherit the BaseAgent class, give it name, and optionally register the agent. We will create a new file called my_panda.py and add the following
import sapien
import numpy as np
from mani_skill.agents.base_agent import BaseAgent, Keyframe
from mani_skill.agents.controllers import *
from mani_skill.agents.registration import register_agent
@register_agent()
class MyPanda(BaseAgent):
    uid = "my_panda"
Registering the agent allows you to create environments that instantiate your robot for you via a string uid in the future with the code below:
import mani_skill.envs
import my_panda
env = gym.make("EmptyEnv-v1", robot_uids="my_panda")
With the base robot class started, now we need to import a robot definition from a URDF or MJCF
Importing the Robot#
To import a URDF/MJCF file, you simply provide a path to the definition file and ManiSkill handles the importing. ManiSkill will automatically create the appropriate articulation with links and joints defined in the given definition file. Internally ManiSkill uses either the URDFLoader or MJCFLoader class in the mani_skill.utils.building module.
URDF#
To get started, you first need to get a valid URDF file like this one for the Panda robot
Then in the agent class add the urdf_path.
class MyPanda(BaseAgent):
    uid = "my_panda"
    urdf_path = f"path/to/your/robot.urdf"
Note that there are a number of common issues users may face (often due to incorrectly formatted URDFs / collision meshes) which are documented in the FAQ / Troubleshooting Section
Mujoco MJCF#
ManiSkill supports importing Mujoco’s MJCF format of files to load robots (and other objects), although not all features are supported.
For example code that loads the robot and the scene see https://github.com/haosulab/ManiSkill/blob/main/mani_skill/envs/tasks/control/cartpole.py. Generally you can simply replace the urdf_path property of the agent used in URDF based agents with mjcf_path property and it will use the MJCF loader instead.
At the moment, the following are not supported:
Procedural texture generation
Importing motors and solver configurations
Correct use of contype and conaffinity attributes (contype of 0 means no collision mesh is added, otherwise it is always added)
Correct use of groups (at the moment anything in group 0 and 2 can be seen by default, other groups are hidden all the time)
These may be supported in the future so stay tuned for updates.
Robot Loading Options#
Some robots need additional configuration to be loaded e.g. quadrupeds. For Quadrupeds, we need to ensure the root link is not fixed so the robot body can freely move around. For the AnymalC robot this was done by doing
class ANYmalC(BaseAgent):
    # ...
    fix_root_link = False
You can also automatically disable all self collisions of the robot by adding disable_self_collisions = True although this is not recommended. If you want to disable self collisions to improve simulation speed, we recommend instead simplifying the collision meshes, see this section for what it looks like.
Testing the loaded URDF/MJCF#
We recommend you create a simple test script test.py that imports your new robot and leverages the existing demo robot script. While not required it may be helpful to read the demo robot script in order to get more familiarity with using ManiSkill. In test.py write
import my_panda # imports your robot and registers it
# imports the demo_robot example script and lets you test your new robot
import mani_skill.examples.demo_robot as demo_robot_script
demo_robot_script.main()
Then run the following to open the simulation visualizer (without taking any actions) to let you look at the robot.
python test.py -r "my_panda" # the uid of your new robot
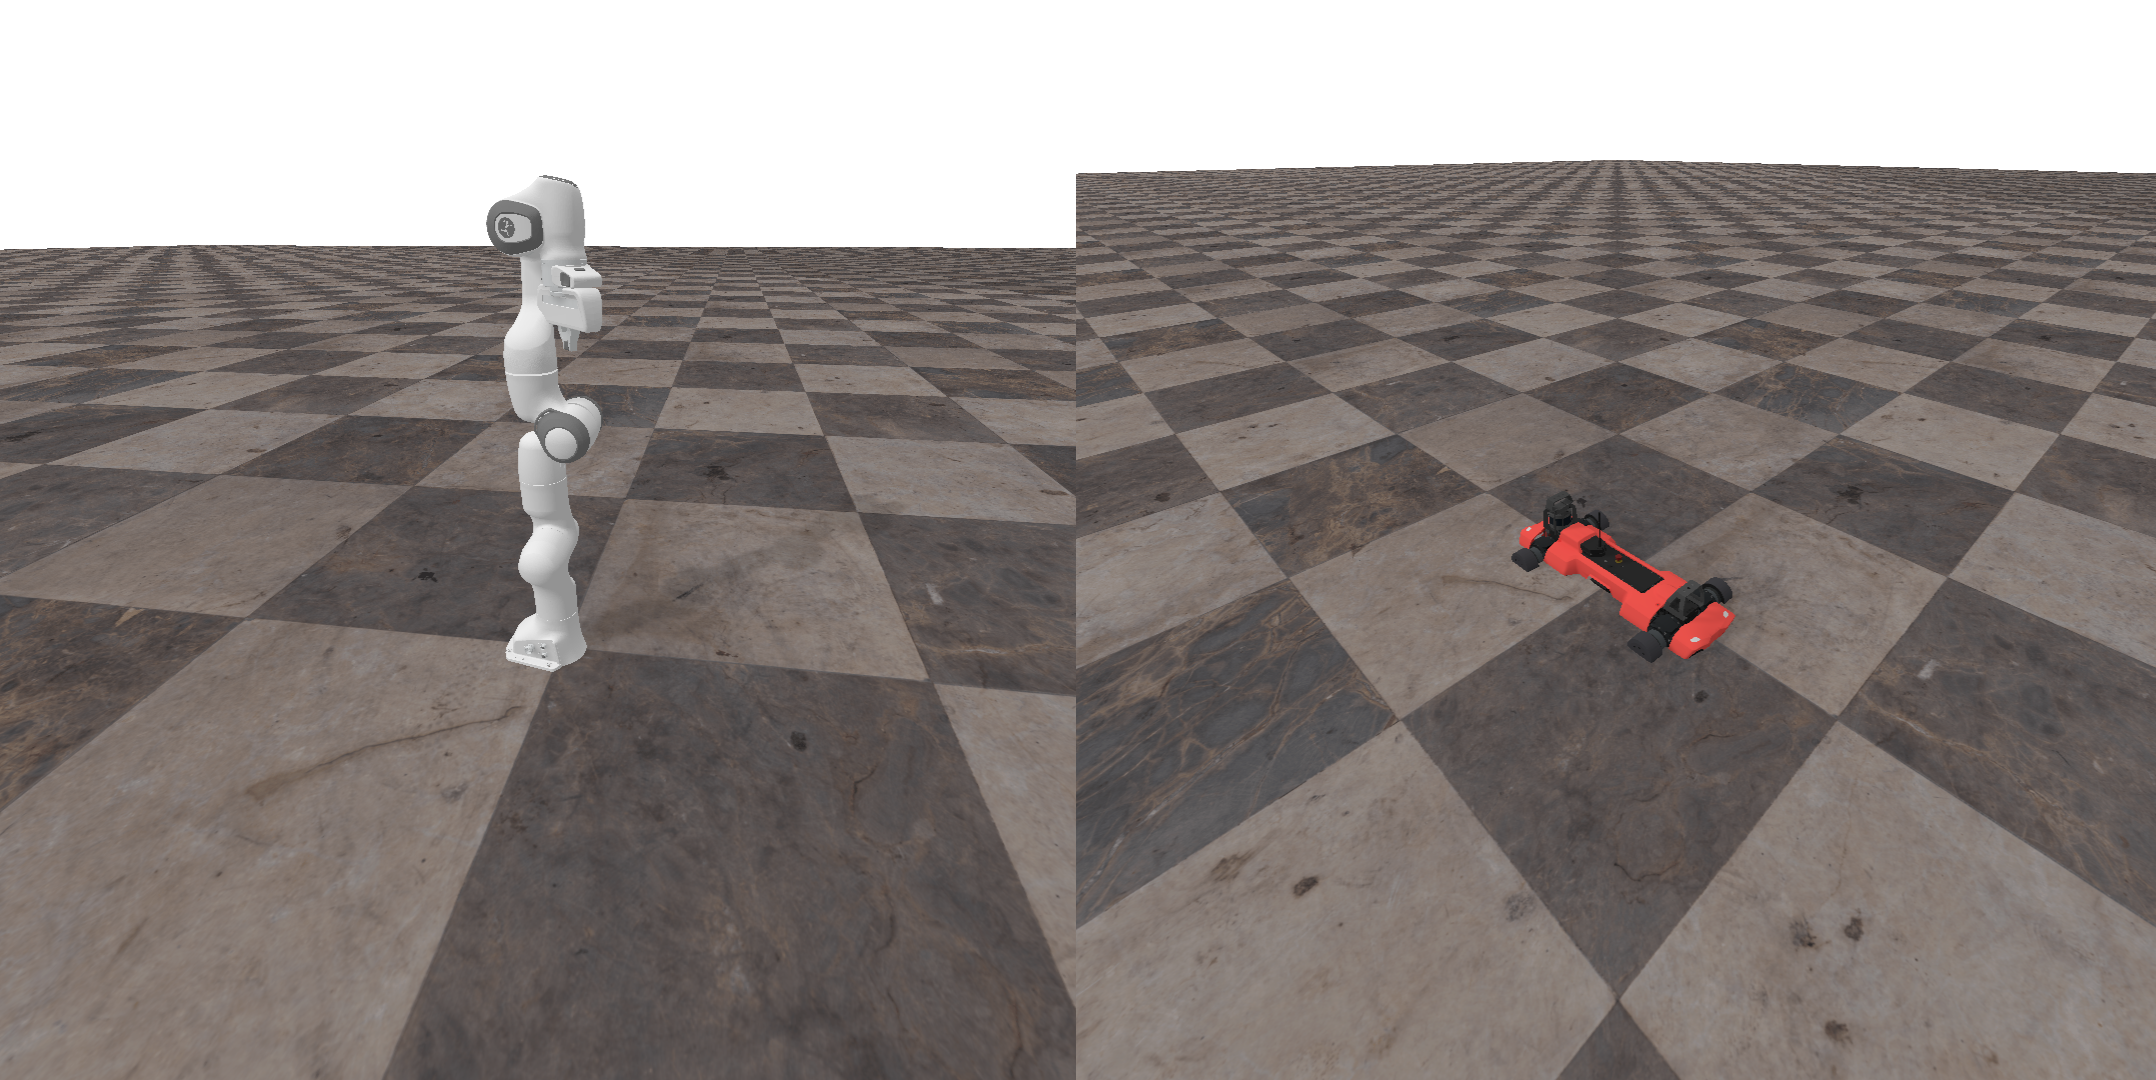
If you used the panda URDF it should look something like this where the robot is at position 0 and all joints are set to 0. Some robots might be seen sunken into the ground e.g. what the ANYmal-C quadruped looks like. This is because we initialize the pose of the root link of the robot to be 0, which might make it be inside the ground. We will fix this in the next step by defining a keyframe from which we can initialize from.
2. Defining Keyframes#
It sometimes is useful to define some predefined robot poses and joint positions that users can initialize to to visualize the robot in poses of interest. This is an idea adopted from Mujoco’s keyframes
For example, we define a “rest” keyframe for the panda robot and a “standing” keyframe for the quadruped. These keyframes let you define a pre-defined pose, and optionally qpos (joint positions) and qvel (joint velocities).
class MyPanda(BaseAgent):
    # ...
    keyframes = dict(
        rest=Keyframe(
            qpos=np.array(
                [0.0, np.pi / 8, 0, -np.pi * 5 / 8, 0, np.pi * 3 / 4, np.pi / 4, 0.04, 0.04]
            ),
            pose=sapien.Pose(),
        )
    )
class ANYmalC(BaseAgent):
    # ...
    keyframes = dict(
        standing=Keyframe(
            # notice how we set the z position to be above 0, so the robot is not intersecting the ground
            pose=sapien.Pose(p=[0, 0, 0.545]),
            qpos=np.array(
                [0.03, -0.03, 0.03, -0.03, 0.4, 0.4, -0.4, -0.4, -0.8, -0.8, 0.8, 0.8]
            ),
        )
    )
The keyframe can also specify qvel values as well. Using that keyframe you can set the robot to the given pose, qpos, qvel and you can get the desired predefined keyframe
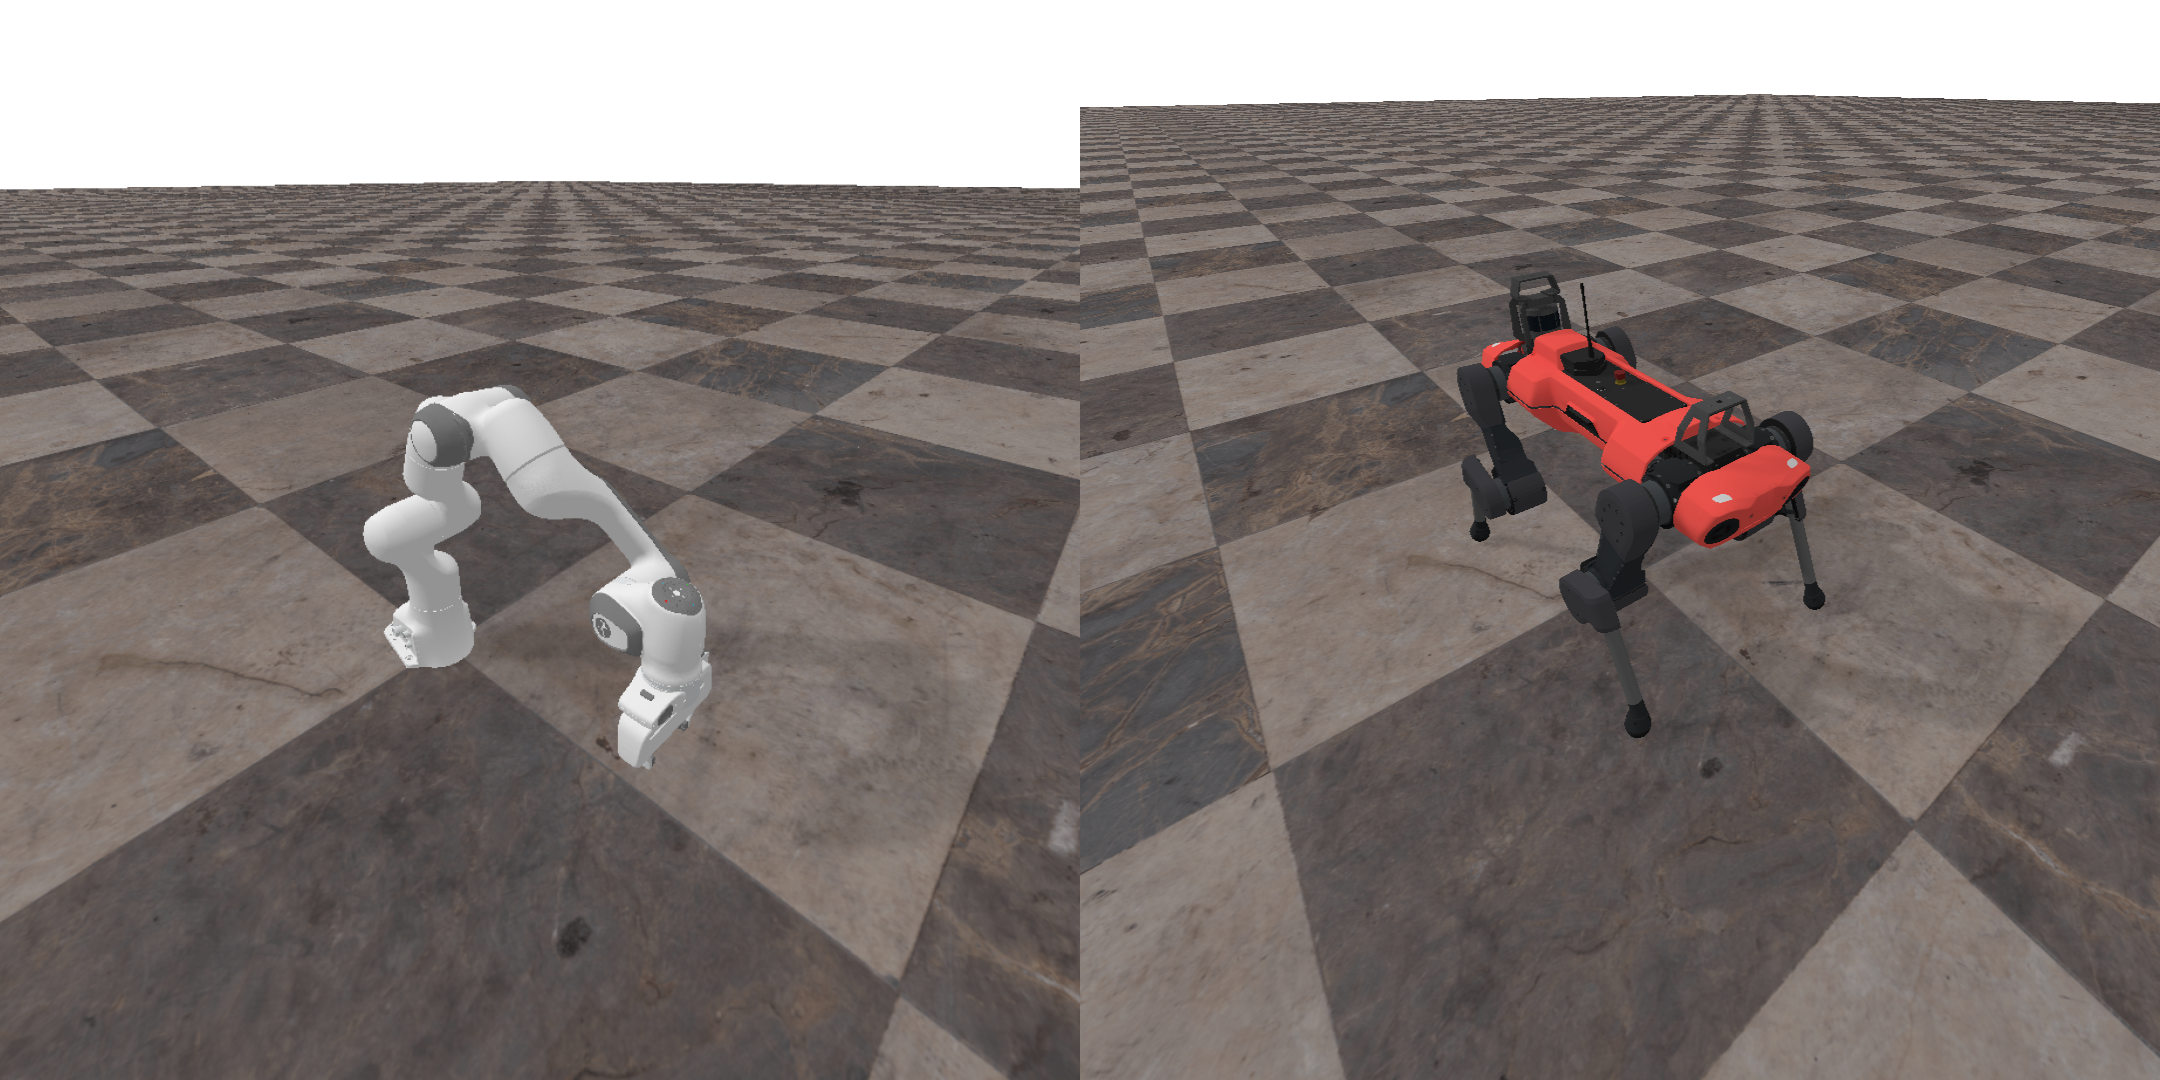
Running the script again should have correctly loaded poses and joint positions. The script by default picks the first keyframe defined. You can add more and select them shown below. You may also want to check if it is working on the GPU simulation as well
python test.py -r "my_panda"
python test.py -r "my_panda" -b "gpu" # use gpu simulation
python test.py -r "my_panda" -k "name_of_keyframe_to_show"
3. Defining Controllers#
ManiSkill permits defining multiple controllers for a single agent/robot, allowing for easy research and testing on different controllers to explore problems like sim2real and more.
In general, for each active joint in a robot (which is represented as an Articulation object), you must define some controller over it. You can check which joints are active by checking your .urdf file and looking for all joints where the type attribute is not "fixed". Another simple and easy way to check is to directly use the URDF or MJCF loader yourself and print the active joints which can be done as so
import sapien
from mani_skill.envs.scene import ManiSkillScene
from mani_skill.utils.building import URDFLoader
loader = URDFLoader()
loader.set_scene(ManiSkillScene())
robot = loader.load("path/to/robot.urdf")
print(robot.active_joints_map.keys())
# For Panda it prints
# dict_keys(['panda_joint1', 'panda_joint2', 'panda_joint3', 'panda_joint4', 'panda_joint5', 'panda_joint6', 'panda_joint7', 'panda_finger_joint1', 'panda_finger_joint2'])
By default, ManiSkill provides out of the box several kinds of controllers, the main ones that you may typically use are the PDJointPosController, PDEEPoseController, and the PassiveController.
You can find more information on provided controllers and how some work in detail on the controllers documentation
In brief, we will show how to work with both the PDJointPosController and PDJointPosMimicController here as they are both defined for the Panda robot. The first is for controlling the arm, and the mimic controller is for controlling the grippers.
To define controllers, you need to implement the _controller_configs property as done below
class MyPanda(BaseAgent):
    # ...
    arm_joint_names = [
        "panda_joint1",
        "panda_joint2",
        "panda_joint3",
        "panda_joint4",
        "panda_joint5",
        "panda_joint6",
        "panda_joint7",
    ]
    gripper_joint_names = [
        "panda_finger_joint1",
        "panda_finger_joint2",
    ]

    arm_stiffness = 1e3
    arm_damping = 1e2
    arm_force_limit = 100

    gripper_stiffness = 1e3
    gripper_damping = 1e2
    gripper_force_limit = 100

    @property
    def _controller_configs(self):
        arm_pd_joint_pos = PDJointPosControllerConfig(
            self.arm_joint_names,
            lower=None,
            upper=None,
            stiffness=self.arm_stiffness,
            damping=self.arm_damping,
            force_limit=self.arm_force_limit,
            normalize_action=False,
        )
        arm_pd_joint_delta_pos = PDJointPosControllerConfig(
            self.arm_joint_names,
            lower=-0.1,
            upper=0.1,
            stiffness=self.arm_stiffness,
            damping=self.arm_damping,
            force_limit=self.arm_force_limit,
            use_delta=True,
        )
        gripper_pd_joint_pos = PDJointPosMimicControllerConfig(
            self.gripper_joint_names,
            lower=-0.01,  # a trick to have force when the object is thin
            upper=0.04,
            stiffness=self.gripper_stiffness,
            damping=self.gripper_damping,
            force_limit=self.gripper_force_limit,
        )

        controller_configs = dict(
            pd_joint_delta_pos=dict(
                arm=arm_pd_joint_delta_pos, gripper=gripper_pd_joint_pos
            ),
            pd_joint_pos=dict(
              arm=arm_pd_joint_pos, gripper=gripper_pd_joint_pos
            ),
        )
        # Make a deepcopy in case users modify any config
        return deepcopy_dict(controller_configs)
We defined two controllers to control the arm joints and one for the gripper. Using a dictionary, you can define multiple control modes that interchangeably use different controllers of the joints. Above we defined a pd_joint_delta_pos and a pd_joint_pos controller which switch just the controller of the arm joints.
Note that by default we automatically balance passive forces (gravity) for controlling. This behavior is not desirable for robots where the root is not fixed like Quadrupeds or humanoids. To disable that simply add balance_passive_force=False to the controller dict.
controller_configs = dict(
    pd_joint_delta_pos=dict(
        arm=arm_pd_joint_delta_pos, gripper=gripper_pd_joint_pos,
        balance_passive_force=False
    ),
    # ...
)
# ...
To try this out, simply run the following and unpause the simulation when you are ready (pause button at the top left)
python test.py -r "my_panda" -c "pd_joint_delta_pos" --random-actions
python test.py -r "my_panda" -c "pd_joint_delta_pos" -b "gpu" --random-actions
This samples random actions to take using the given controller. You may want to tune the controller so that the robot doesn’t move too far but also doesn’t move too little.
You can also test the stability of the robot you modelled by trying and set all the joints to the keyframe qpos values with the pd_joint_pos controller as so
python test.py -r "my_panda" -c "pd_joint_pos" --keyframe-actions
python test.py -r "my_panda" -c "pd_joint_pos" -b "gpu" --keyframe-actions
If the robot is staying still in the given keyframe, it is working well.
Stiffness corresponds with the P and damping corresponds with the D of PD controllers, see the controllers page for more details.
Tuning the values of stiffness, damping, and other properties affect the sim2real transfer of a simulated robot to the real world. At the moment our team is working on developing a better pipeline with documentation for system identification to pick better controllers and/or hyperparameters.
Note that when taking a robot implemented in another simulator like Mujoco, you usually cannot directly copy the joint hyperparameters to ManiSkill, so you almost always need some manual tuning.
4. Defining Sensors#
ManiSkill supports defining sensors mounted onto the robot and sensors positioned relative to the robot by defining the _sensor_configs property.
An example of this done in the Panda robot with a real sense camera attached:
from mani_skill.sensors.camera import CameraConfig
class MyPanda(Panda):
    # ...
    @property
    def _sensor_configs(self):
        return [
            CameraConfig(
                uid="hand_camera",
                pose=sapien.Pose(p=[0, 0, 0], q=[1, 0, 0, 0]),
                width=128,
                height=128,
                fov=np.pi / 2,
                near=0.01,
                far=100,
                mount=self.robot.links_map["camera_link"],
            )
        ]
You simply return a sensor config (here we use a CameraConfig) to define the sensor to add, and specify where to mount the sensor. For most sensors, you must define a pose, which is now used as a pose relative to the mount pose. In the example above we add a camera to the camera link / wrist mount of the panda robot (which is already oriented facing the correct direction so the pose defined is just the identity).
To visualize the sensor data you can use the same demo script and open this tab
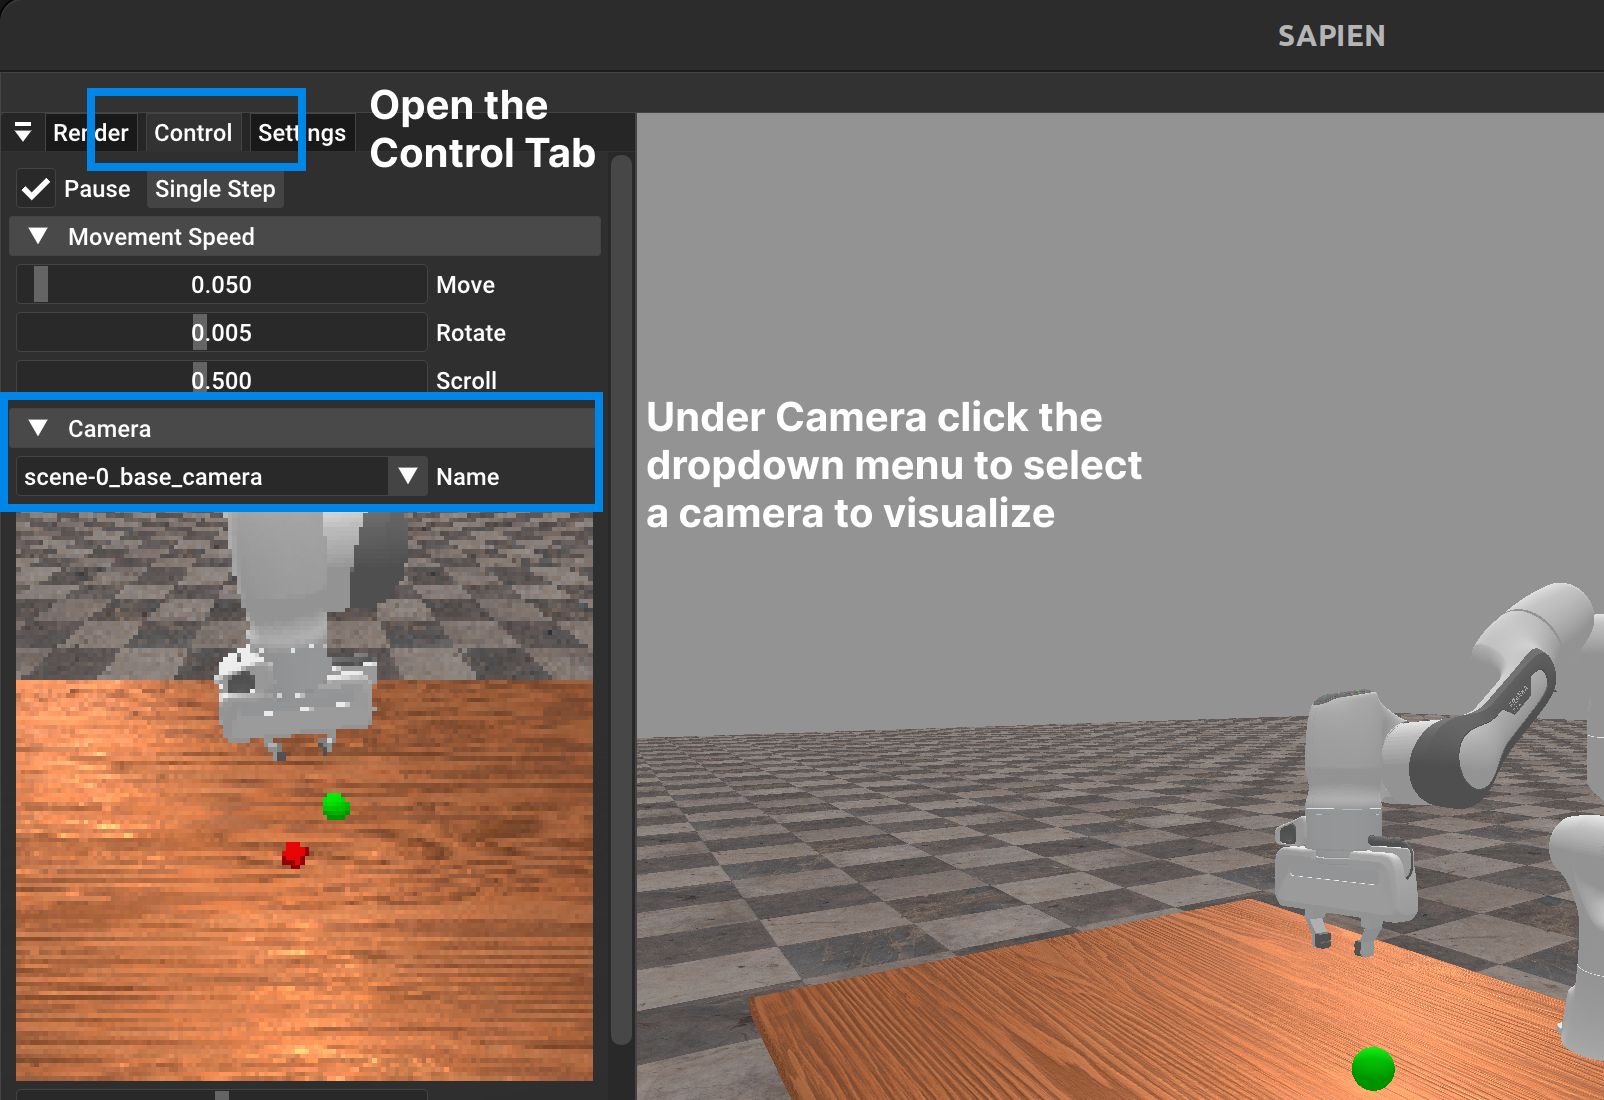
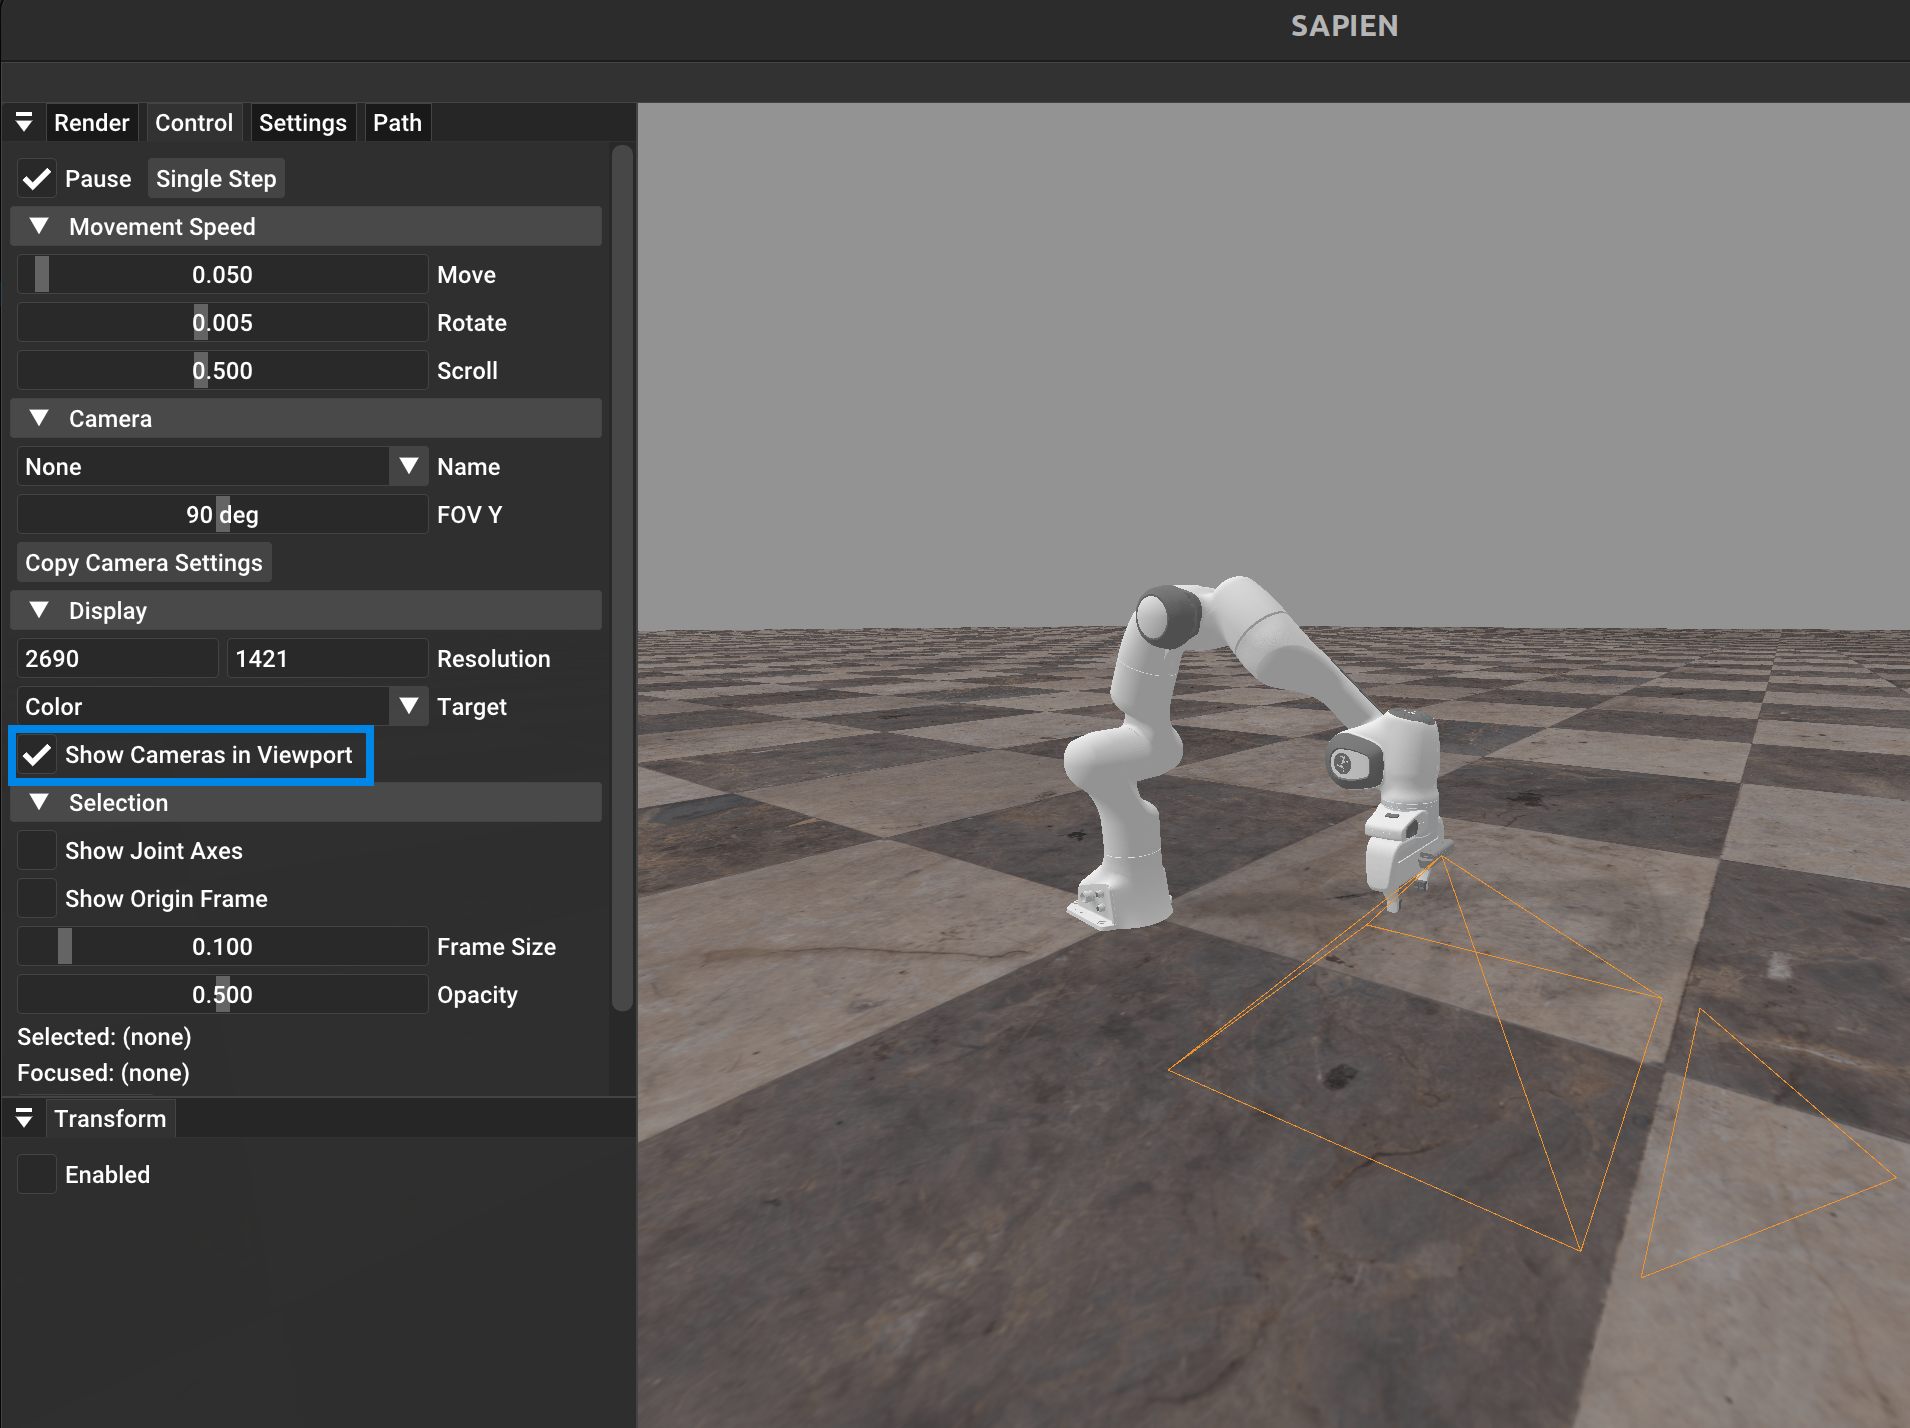
You can also visualize where the camera is in the viewport as so:
5. Modeling Link Materials#
Finally, in order to ensure correct simulation, you likely will need to modify the physical materials (controlling e.g. friction) of parts of the robot in order to enable quadruped movement or object manipulation via grasping. By default all objects start with static and dynamic friction values of 0.3, but this is insufficient for picking up objects and will cause most objects to slip out of the gripper. To fix this, you can define a urdf_config as so. You can define a default material (here we define a gripper material) and then use that as a template to instantiate the materials of specific links. We only set the material for the left and right finger links.
class MyPanda(BaseAgent):
    # ...
    urdf_config = dict(
        _materials=dict(
            gripper=dict(static_friction=2.0, dynamic_friction=2.0, restitution=0.0)
        ),
        link=dict(
            panda_leftfinger=dict(
                material="gripper", patch_radius=0.1, min_patch_radius=0.1
            ),
            panda_rightfinger=dict(
                material="gripper", patch_radius=0.1, min_patch_radius=0.1
            ),
        ),
    )
    # ...
Generally a friction of 2.0 is as high as you may ever need to go and is a good value to start with if you want this part of the robot to be able to grab onto something / prevent any slipping. For the ANYmal-C robot a friction of 2.0 was set as well for the 4 feet links.
Advanced Tips and Tricks#
Fast Simulation Tricks#
Ultimately a fast simulation depends on correct and efficient modelling of the robots and the objects in the environment. For robots, there are a few notable ways to improve simulation speed, especially on the GPU.
Simplified Collision Meshes#
Simulation is in essence a contact collision solver, and this runs faster when there are
Less contacts
Contacts that do exist are between simple primitive shapes (planes, boxes, cylinders etc.)
To achieve fewer contacts and leverage just basic primitives, the model of the ANYmal-C robot has been massively simplified as shown below.

Another way to achieve fewer contacts is to remove collision shapes/meshes that are more often not going to be close to another one. Normally the collision mesh of the quadruped above is “dense” with no gaps between parts. By leaving big enough gaps in between, the physics simulation never needs to bother checking collisions between parts that are normally close together. The minimum gap required is determined by the simulation configuration contact_offset which acts as a first-pass filter to determine whether a contact between two bodies (Actor/Links) in the simulation needs to be checked and resolved.
Moreover, when there are fewer contacts the GPU memory requirements are significantly lessened.
Tuned Simulation Configurations#
Depending on the task you can massively increase simulation speed by reducing the solver_position_iterations configuration. Generally as a rule of thumb you need solver_position_iterations value of 15 or more to accurately simulate robot manipulation (this again depends on a case by case basis). For navigation / locomotion tasks a solver_position_iterations value of 4 may suffice.
See the sim configuration definition for more details.
Condensed Robot Descriptions (WIP)#
Simulating robots can be much faster when the number of joints and links are smaller. Many robot URDFs out there often have a ton of useless joints/links that are fixed and arise due to how people export URDFs. We are still writing a tool that tries to automatically “compress” URDF files to get rid of the useless joints/links and merge them where possible.
Mobile Bases#
Robots like Fetch have a mobile base, which allows translational movement and rotational movement of the entire robot. In simulation, it is not trivial to simulate the actual physics of wheels moving along a floor and simulating this would be fairly slow.
Instead, similar to many other simulators a “fake” mobile base is made (that is realistic enough to easily do sim2real transfer in terms of the controller). This is made by modifying a URDF of a robot like Fetch, and adding joints that let the base link translate (prismatic joint) and rotate (revolute joint). See the Fetch URDF code for the modifications made.
After modifying the URDF to include dummy links to allow mobile base movement, you then should define a controller (recommended to be separate from the rest of the robot). For the Fetch robot we define a separate controller for the robot arm, gripper, body, and the mobile-base via dictionaries in our codebase here. We recommend using the PDBaseVelControllerConfig as done below which permits control via XY translational movement and Z-axis rotation.
class Fetch(BaseAgent):
    # ...
    @property
    def _controller_configs(self):
        # ... defining other controllers
        base_pd_joint_vel = PDBaseVelControllerConfig(
            self.base_joint_names,
            lower=[-0.5, -0.5, -3.14],
            upper=[0.5, 0.5, 3.14],
            damping=1000,
            force_limit=500,
        )

        controller_configs = dict(
            pd_joint_delta_pos=dict(
                arm=arm_pd_joint_delta_pos,
                gripper=gripper_pd_joint_pos,
                body=body_pd_joint_delta_pos,
                base=base_pd_joint_vel,
            ),
            # ...
        )
        # ...
Finally, we also need to disable collisions between parts of the robot and the floor it is moving on top of. This is to increase simulation speed as there is no need to compute contact between the robot and the floor (the robot is technically hovering to simulate mobile base movement).
For fetch, we only really need to disable the collisions between the wheel links that are too close to the floor and the floor itself.
This is done by implementing the _after_init function as so
class Fetch(BaseAgent):
    # ...
    def _after_init(self):
        self.l_wheel_link: Link = self.robot.links_map["l_wheel_link"]
        self.r_wheel_link: Link = self.robot.links_map["r_wheel_link"]
        for link in [self.l_wheel_link, self.r_wheel_link]:
            link.set_collision_group_bit(group=2, bit_idx=30, bit=1)
And then in whichever task code you write that builds a ground plane, suppose the Actor object is stored at self.ground while loading the scene you can run
def _load_scene(self, options: dict):
    # ...
    self.ground.set_collision_group_bit(group=2, bit_idx=30, bit=1)
Disabling collisions can be a bit confusing but generally anything that has their collision group 2 bit set will not collide with any other object that has the same bit set to 1. There is also a maximum of 32 settable bits (from bit_idx = 0 to bit_idx=31).
Tactile Sensing#
WIP
For now see the implementation of Allegro hand with touch sensors
Quadrupeds / Legged motion#
For fast simulation of quadrupeds a few tricks are generally used. We will use the ANYmal-C robot as a case study.
First is the use of simplified collision meshes. The URDF used by ManiSkill is this one and the original URDF is saved here. You will notice that the anymal.urdf file has noticeably less collisions defined and in fact the collision mesh compared to the visual mesh looks like this:
You can view collisions of any object/articulation in the simulation via the GUI viewer by clicking any link on the articulation and under the articulation tab click Show collision. For individual objects you can do the same under the Entity tab.
FAQ / Troubleshooting#
On Importing URDF files#
Loaded robot does not have the right render materials / colors showing up:
Likely caused by improper use of <material> tags in the URDF. Double check the material tags each have unique names and are correctly written according to the URDF format
The collision of the robot seems off (e.g. sinks through floor, objects that should collide are not colliding etc.):
In the viewer when visualizing the robot you created, click any link on the robot and under the Articulation tab scroll down and click Show collision. This visualizes all collision meshes used for contact simulation and shows you what was loaded from the URDF. You can then edit / modify the <collision> tags of the URDF accordingly
The collision shape looks completely different from the visual (like a convex version of it)
This can be caused by a few reasons. One may be that your defined base agent has its load_multiple_collisions property set to False. If the collision meshes you use have multiple convex shapes that can be loaded (preferably a .ply or .glb format), then setting load_multiple_collisions = True in your custom robot class can work.
Another reason is if your collision mesh is in the .stl format. Our loader has some issues loading .stl files at times and we recommend converting them to .glb as that is the easiest for our system to load and interpret.
Another issue is if your collision mesh does not have multiple convex shapes, you may have to decompose those meshes yourself via a tool like COACD.